# 基本概念
# 1.Ignite C++是什么?
Ignite是:
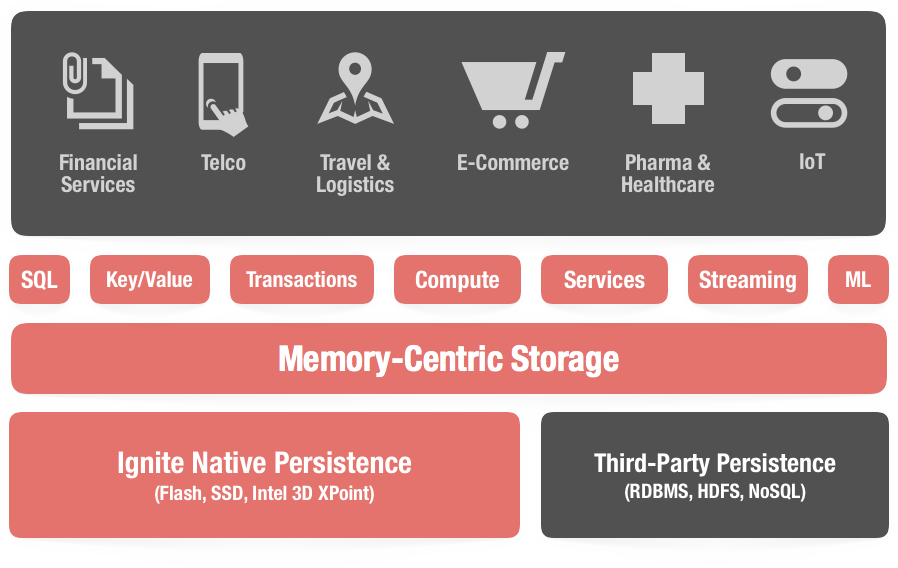
一个以内存为中心的分布式数据库、缓存和处理平台,可以在PB级数据中,以内存级的速度进行事务性、分析性以及流式负载的处理。
# 1.1.固化内存
Ignite的固化内存组件不仅仅将内存作为一个缓存层,还视为一个全功能的存储层。这意味着可以按需将持久化打开或者关闭。如果持久化关闭,那么Ignite就可以作为一个分布式的内存数据库或者内存数据网格,这完全取决于使用SQL和键-值API的喜好。如果持久化打开,那么Ignite就成为一个分布式的,可水平扩展的数据库,它会保证完整的数据一致性以及集群故障的可恢复能力。
# 1.2.Ignite持久化
Ignite的原生持久化是一个分布式的、支持ACID以及兼容SQL的磁盘存储,它可以作为一个可选的磁盘层与Ignite的固化内存透明地集成,然后将数据和索引存储在SSD、闪存、3D XPoint以及其它类型的非易失性存储中。
打开Ignite的持久化之后,就不需要将所有的数据和索引保存在内存中,或者在节点或者集群重启后对数据进行预热,因为固化内存和持久化紧密耦合之后,会将其视为一个二级存储层,这意味着在内存中数据和索引的一个子集如果丢失了,固化内存会从磁盘上进行获取。
# 1.3.ACID兼容
存储在Ignite中的数据,在内存和磁盘上是同时支持ACID的,使Ignite成为一个强一致的系统,Ignite可以在整个拓扑的多台服务器上保持事务。
# 1.4.完整的SQL支持
Ignite提供了完整的SQL、DDL和DML的支持,可以使用纯SQL而不用写代码与Ignite进行交互,这意味着只使用SQL就可以创建表和索引,以及插入、更新和查询数据。有这个完整的SQL支持,Ignite就可以作为一种分布式SQL数据库。
# 1.5.键-值
Ignite的内存数据网格组件是一个完整的事务型分布式键值存储,它可以在有几百台服务器的集群上进行水平扩展。在打开持久化时,Ignite可以存储比内存容量更大的数据,并且在整个集群重启之后仍然可用。
# 1.6.并置处理
大多数传统数据库是以客户机-服务器的模式运行的,这意味着数据必须发给客户端进行处理,这个方式需要在客户端和服务端之间进行大量的数据移动,通常来说不可扩展。而Ignite使用了另外一种方式,可以将轻量级的计算发给数据,即数据的并置计算,从结果上来说,Ignite扩展性更好,并且使数据移动最小化。
# 1.7.可扩展性和持久性
Ignite是一个弹性的、可水平扩展的分布式系统,它支持按需地添加和删除节点,Ignite还可以存储数据的多个副本,这样可以使集群从部分故障中恢复。如果打开了持久化,那么Ignite中存储的数据可以在集群的完全故障中恢复。Ignite集群重启会非常快,因为数据从磁盘上获取,瞬间就具有了可操作性。从结果上来说,数据不需要在处理之前预加载到内存中,而Ignite会缓慢地恢复内存级的性能。
# 1.8.Ignite和Ignite C++
- Ignite C++构建于Ignite之上;
- Ignite C++在同一个进程中启动JVM,并且通过JNI与之通信;
- .NET、C++和Java节点可以加入同一个集群,使用相同的缓存,并且使用通用的二进制协议进行互操作;
- Java计算作业可以在任意节点上执行(Java、.NET和C++)。
# 2.Ignite定位
Ignite是不是持久化或者纯内存存储?
都是,Ignite的原生持久化可以打开,也可以关闭。这使得Ignite可以存储比可用内存容量更大的数据集。也就是说,可以只在内存中存储较少的操作性数据集,然后将不适合存储在内存中的较大数据集存储在磁盘上,即为了提高性能将内存作为一个缓存层。
Ignite是不是内存数据库(IMDB)?
是,虽然Ignite的固化内存在内存和磁盘中都工作得很好,但是磁盘持久化是可以关闭的,使Ignite成为一个支持SQL以及分布式关联的内存数据库。
Ignite是不是内存数据网格(IMDG)?
是,Ignite是一个全功能的数据网格,它既可以用于纯内存模式,也可以带有Ignite的原生持久化,它也可以与任何第三方数据库集成,包括RDBMS和NoSQL。
Ignite是不是一个分布式缓存?
是,如果关闭原生持久化,Ignite就会成为一个分布式缓存,Ignite实现了JCache规范(JSR107),并且提供了比规范要求更多的功能,包括分区和复制模式、分布式ACID事务、SQL查询以及原生持久化等。
Ignite是不是分布式数据库?
是,在整个集群的多个节点中,Ignite中的数据要么是分区模式的,要么是复制模式的,这给系统带来了伸缩性,增加了系统的弹性。Ignite可以自动控制数据如何分区,同时,开发者也可以插入自定义的分布(关联)函数,以及为了提高效率将部分数据并置在一起。
Ignite是不是关系型SQL数据库?
不完整,尽管Ignite的目标是和其它的关系型SQL数据库具有类似的行为,但是在处理约束和索引方面还是有不同的。Ignite支持一级和二级索引,但是只有一级索引支持唯一性,Ignite还不支持外键约束。
总体来说,Ignite作为约束不支持任何会导致集群广播消息的更新以及显著降低系统性能和可伸缩性的操作。
Ignite是不是一个NoSQL数据库?
不完全,和其它NoSQL数据库一样,Ignite支持高可用和水平扩展,但是,和其它的NoSQL数据库不同,Ignite支持SQL和ACID。
Ignite是不是事务型数据库?
不完整,ACID事务是支持的,但是仅仅在键-值API级别,Ignite还支持跨分区的事务,这意味着事务可以跨越不同服务器不同分区中的键。
Ignite在2.7版本中,通过MVCC技术,实现了包括SQL事务在内的全事务支持,不过目前还处于测试阶段。
Ignite是不是一个多模式数据库?
是,Ignite的数据建模和访问,同时支持键值和SQL,另外,Ignite还为在分布式数据上的计算处理,提供了强大的API。
Ignite是不是键-值存储?
是,Ignite提供了丰富的键-值API,兼容于JCache (JSR-107),并且支持Java,C++和.NET。
固化内存是什么?
Ignite的固化内存架构使得Ignite可以将内存计算延伸至磁盘,它基于一个页面化的堆外内存分配器,它通过预写日志(WAL)的持久化来对数据进行固化,当持久化禁用之后,固化内存就会变成一个纯粹的内存存储。
并置处理是什么?
Ignite是一个分布式系统,因此,有能力将数据和数据以及数据和计算进行并置就变得非常重要,这会避免分布式数据噪声。当执行分布式SQL关联时数据的并置就变得非常的重要。Ignite还支持将用户的逻辑(函数,lambda等)直接发到数据所在的节点然后在本地进行数据的运算。
# 3.入门
# 3.1.要求
Apache Ignite官方在如下环境中进行了测试:
- JDK:Oracle JDK8及以上,Open JDK8及以上,IBM JDK8及以上;
- OS:Windows (Vista及以上),Windows Server (2008及以上),Ubuntu (14.x和15.x);
- 网络:没有限制(建议10G);
- 硬件:没有限制;
- C++编译器:MS Visual C++ (10.0及以上), g++ (4.4.0及以上);
- Visual Studio:2010及以上。
# 3.2.安装
以下是安装Ignite С++的概述:
- 从官网下载Ignite的压缩包;
- 在本机中将压缩包解压到安装文件夹。
从源代码构建
Ignite C++基于Ignite,因此首先需要构建Java代码,具体可以参见Ignite版本的相关页面。
另外,如果要构建测试,还会需要Boost,在Windows中需要正确配置BOOST_HOME环境变量,如果不需要测试,可以排除测试的工程,或者不对它们进行编译。在Linux中可以使用configure脚本,具体可以调用./configure --help寻求帮助。
使用如下的命令可以构建C++的二进制包:
Windows:
cd modules\platforms\cpp\project\vs

msbuild ignite.sln /p:Configuration=Release /p:Platform=x64
Linux(系统范围)
cd modules/platforms/cpp
libtoolize && aclocal && autoheader && automake --add-missing && autoreconf

# You can call the following command to see all the available
# configuration options:
# ./configure --help
# To use default configuration just type:
./configure
make

#The following step is optional if you want to install Ignite
#for your system. It would probably require root:
sudo make install
Linux(本地目录)
cd modules/platforms/cpp
libtoolize && aclocal && autoheader && automake --add-missing && autoreconf

# You can call the following command to see all the available
# configuration options:
# ./configure --help
#
# Specify a target subdirectory in your user's home dir:
./configure --prefix=/home/user/odbc
make

#The following step is needed if you want to install Ignite
#under specified prefix directory.
make install
如要构建整个工程,需要boost.test库
如果不打算运行测试,就不要构建整个工程,或者说,可以只构建需要的工程。在Windows上,可以通过单击解决方案资源管理器中感兴趣的工程并选择“构建”来实现这一点。在Linux上,可以使用configure脚本启用/禁用不同组件的构建。
# 3.3.从命令行启动
一个Ignite节点可以从命令行启动,或者使用默认的配置,或者也可以传入一个配置文件。可以启动任意数量的节点,它们会自动地进行彼此发现。
平台互操作性
如果要尝试部署一个同时包含Java和C++节点的集群,请注意看下面的平台互操作性章节,确保做了和异构集群有关的额外配置。
使用默认的配置
要用默认配置启动一个节点,打开终端,然后转到IGNITE_HOME文件夹(Ignite安装文件夹),使用上面的命令构建完成二进制包之后,只需要输入:
Windows:
modules\platforms\cpp\project\vs\x64\Release\ignite.exe
Linux:
./modules/platforms/cpp/ignite/ignite
输出大致如下:
[16:47:37] Ignite node started OK (id=ee97150d)
[16:47:37] Topology snapshot [ver=1, servers=1, clients=0, CPUs=2, heap=0.89GB]
ignite.exe默认会使用config/default-config.xml文件启动Ignite C++节点。
传递配置文件
如果要从命令行显式传递配置文件,需要在Ignite安装文件夹中输入ignite.exe -springConfigUrl=<path to configuration file>,比如:
Windows:
modules\platforms\cpp\project\vs\x64\Release\ignite.exe -springConfigUrl=c:\work\my-config.xml
Linux:
./modules/platforms/cpp/ignite/ignite -springConfigUrl=~/work/my-config.xml
# 3.4.第一个数据网格应用
下面是一些小例子,进行分布式缓存的put/get操作,还有就是执行基本的事务:
Put和Get:
using namespace ignite;
using namespace cache;

IgniteConfiguration cfg;

// Start a node.
Ignite grid = Ignition::Start(cfg);

// Get cache instance.
Cache<int, std::string> cache = grid.GetOrCreateCache<int, std::string>("myCache");

// Store keys in cache (values will end up on different cache nodes).
for (int i = 0; i < 10; ++i)
{
    std::stringstream value;
    value << i;

    cache.Put(i, value.str());
}

for (int i = 0; i < 10; ++i)
  	std::cout << "Got [key=" << i << ", val=" << cache.Get(i) << "]";
原子操作:
// Put-if-absent which returns previous value.
std::string oldVal = cache.GetAndPutIfAbsent(11, "Hello");

// Put-if-absent which returns boolean success flag.
bool success = cache.PutIfAbsent(22, "World");

// Replace-if-exists operation (opposite of getAndPutIfAbsent), returns previous value.
oldVal = cache.GetAndReplace(11, "Hello");

// Replace-if-exists operation (opposite of putIfAbsent), returns boolean success flag.
success = cache.Replace(22, "World");

// Replace-if-matches operation.
success = cache.Replace(22, "World", "World!");

// Remove-if-matches operation.
success = cache.Remove(1, "Hello");
# 3.5.Ignite Visor管理控制台
检查数据网格的内容以及执行其它众多管理和监视操作的最简单方法是使用Ignite的Visor命令行工具。
Visor启动方法如下:
bin\ignitevisorcmd.bat
# 4.序列化
# 4.1.限定BinaryType模板
大多数用户定义的类(包括缓存的键和值)会通过Ignite C++ API传输到其它网格节点。
通过网络传输这些类的对象需要序列化。对于Ignite C++,可以通过为类型限定BinaryType类模板来实现:
class Address
{
  friend struct ignite::binary::BinaryType<Address>;
public:
  Address() { }

  Address(const std::string& street, int32_t zip) :
  street(street), zip(zip) { }

  const std::string& GetStreet() const
  {
    return street;
  }

  int32_t GetZip() const
  {
    return zip;
  }

private:
  std::string street;
  int32_t zip;
};

template<>
struct ignite::binary::BinaryType<Address>
{
  static int32_t GetTypeId()
  {
    return GetBinaryStringHashCode("Address");
  }

  static void GetTypeName(std::string& name)
  {
    name = "Address";
  }

  static int32_t GetFieldId(const char* name)
  {
    return GetBinaryStringHashCode(name);
  }

  static bool IsNull(const Address& obj)
  {
    return obj.GetZip() && !obj.GetStreet().empty();
  }

  static void GetNull(Address& dst)
  {
    dst = Address();
  }

  static void Write(BinaryWriter& writer, const Address& obj)
  {
    writer.WriteString("street", obj.GetStreet());
    writer.WriteInt32("zip", obj.GetZip());
  }

  static void Read(BinaryReader& reader, Address& dst)
  {
    dst.street = reader.ReadString("street");
    dst.zip = reader.ReadInt32("zip");
  }
};
序列化也可以在原始模式下实现,不需要字段名。这提供了最快和最紧凑的序列化,但是无法进行查询:
template<>
struct ignite::binary::BinaryType<Address>
{
  static int32_t GetTypeId()
  {
    return GetBinaryStringHashCode("Address");
  }

  static void GetTypeName(std::string& name)
  {
    name = "Address";
  }

  static int32_t GetFieldId(const char* name)
  {
    return GetBinaryStringHashCode(name);
  }

  static bool IsNull(const Address& obj)
  {
    return false;
  }

  static void GetNull(Address& dst)
  {
    dst = Address();
  }

  static void Write(BinaryWriter& writer, const Address& obj)
  {
    BinaryRawWriter rawWriter = writer.RawWriter();

    rawWriter.WriteString(obj.GetStreet());
    rawWriter.WriteInt32(obj.GetZip());
  }

  static void Read(BinaryReader& reader, Address& dst)
  {
    BinaryRawReader rawReader = reader.RawReader();

    dst.street = rawReader.ReadString();
    dst.zip = rawReader.ReadInt32();
  }
};
# 4.2.宏
Ignite C++定义了一组工具宏,用于简化BinaryType限定,下面是这些宏的列表及其描述:
IGNITE_BINARY_TYPE_START(T):开始二进制类型限定;IGNITE_BINARY_TYPE_END:结束二进制类型限定;IGNITE_BINARY_GET_TYPE_ID_AS_CONST(id):GetTypeId()的实现,它会返回预定义常量id;IGNITE_BINARY_GET_TYPE_ID_AS_HASH(T):GetTypeId()的实现,它会返回传入类型名的哈希值;IGNITE_BINARY_GET_TYPE_NAME_AS_IS(T):GetTypeName()的实现,它会返回类型名;IGNITE_BINARY_GET_FIELD_ID_AS_HASH:GetFieldId()函数的默认实现,它会返回字符串Java模式的哈希值;IGNITE_BINARY_IS_NULL_FALSE(T):IsNull()函数的实现,它总是返回false;IGNITE_BINARY_IS_NULL_IF_NULLPTR(T):IsNull()函数的实现,如果传入对象为NULL指针则返回true;IGNITE_BINARY_GET_NULL_DEFAULT_CTOR(T):GetNull()函数的实现,它会返回一个使用默认构造器创建的实例;IGNITE_BINARY_GET_NULL_NULLPTR(T):GetNull()函数的实现,它会返回NULL指针;
因此,可以使用以下宏描述上面声明的Address类:
namespace ignite
{
  namespace binary
  {
    IGNITE_BINARY_TYPE_START(Address)
      IGNITE_BINARY_GET_TYPE_ID_AS_HASH(Address)
      IGNITE_BINARY_GET_TYPE_NAME_AS_IS(Address)
      IGNITE_BINARY_GET_NULL_DEFAULT_CTOR(Address)
      IGNITE_BINARY_GET_FIELD_ID_AS_HASH

      static bool IsNull(const Address& obj)
      {
        return obj.GetZip() == 0 && !obj.GetStreet().empty();
      }

      static void Write(BinaryWriter& writer, const Address& obj)
      {
        writer.WriteString("street", obj.GetStreet());
        writer.WriteInt32("zip", obj.GetZip());
      }

      static void Read(BinaryReader& reader, Address& dst)
      {
        dst.street = reader.ReadString("street");
        dst.zip = reader.ReadInt32("zip");
      }

    IGNITE_BINARY_TYPE_END
  }
}
# 4.3.值的读写
数据的读写有几种方法,第一个是直接使用对象的值:
写:
CustomType val;

// some application code here
// ...

writer.WriteObject<CustomType>("field_name", val);
读:
CustomType val = reader.ReadObject<CustomType>("field_name");
第二种方法是做同样的事,但是使用的是对象的指针:
写:
// Writing null to as a value for integer field.
writer.WriteObject<int32_t*>("int_field_name", nullptr);

// Writing a value of the custom type by pointer.
CustomType *val;

// some application code here
// ...

writer.WriteObject<CustomType*>("field_name", val);
读:
// Reading value which can be null.
CustomType* nullableVal = reader.ReadObject<CustomType*>("field_name");
if (nullableVal) {
  // ...
}

// You can use a smart pointer as well.
std::unique_ptr<CustomType> nullablePtr = reader.ReadObject<CustomType*>();
if (nullablePtr) {
  // ...
}
基于指针的技术的一个优点是它允许以值的形式对null进行读写。
# 5.平台互操作性
当使用Ignite C++时,在集群中C++和Java节点协同工作是很常见的。为了在C++和Java节点之间无缝互操作,应考虑以下事项:
# 5.1.二进制编组器配置
Ignite的二进制编组器负责集群中的数据、逻辑和消息的序列化和反序列化。由于架构的特殊性,Java和C++节点使用不同的二进制编组器默认配置启动,如果要建立异构集群,则可能导致节点启动过程中的异常,如下面的一个节点:
class org.apache.ignite.spi.IgniteSpiException: Local node's
binary configuration is not equal to remote node's binary configuration
[locNodeId=b3f0367d-3c2b-47b4-865f-a62c656b5d3f,
rmtNodeId=556a3f41-eab1-4d9f-b67c-d94d77ddd89d,
locBinaryCfg={globIdMapper=org.apache.ignite.binary.BinaryBasicIdMapper,
compactFooter=false, globSerializer=null}, rmtBinaryCfg=null]
为了解决这个异常并让Java和C++节点可以共存于单个集群中,需要将以下的二进制编组器配置添加到Java节点的配置中:
<?xml version="1.0" encoding="UTF-8"?>

<beans xmlns="http://www.springframework.org/schema/beans"
       xmlns:xsi="http://www.w3.org/2001/XMLSchema-instance"
       xsi:schemaLocation="http://www.springframework.org/schema/beans
        http://www.springframework.org/schema/beans/spring-beans.xsd">

    <bean id="ignite.cfg" class="org.apache.ignite.configuration.IgniteConfiguration">
	    ...
        <property name="binaryConfiguration">
            <bean class="org.apache.ignite.configuration.BinaryConfiguration">
                <property name="compactFooter" value="false"/>

                <property name="idMapper">
                    <bean class="org.apache.ignite.binary.BinaryBasicIdMapper">
                        <property name="lowerCase" value="true"/>
                    </bean>
                </property>
            </bean>
        </property>
		...
    </bean>
</beans>
# 5.2.基本类型兼容性
C++和Java中的基本类型都可以用在Ignite中。要理解哪种原始C++类型与哪种Java类型相匹配并不容易,反之亦然。为了澄清这一点,可以参考下表:
| Java类型 | C++类型 |
|---|---|
boolean,java.lang.Boolean | bool |
byte,java.lang.Byte | int8_t |
short,java.lang.Short | int16_t |
int,java.lang.Integer | int32_t |
long,java.lang.Long | int64_t |
float,java.lang.Float | float |
double,java.lang.Double | double |
char,java.lang.Character | uint16_t |
java.lang.String | std::string,char[] |
java.util.Date | ignite::Date |
java.sql.Time | ignite::Time |
java.sql.Timestamp | ignite::Timestamp |
java.util.UUID | ignite::Guid |
# 5.3.定义跨平台类型
为了从Java和C++节点访问同一个对象,在两种语言中应该以相同的方式描述它。这包括相同的类型名、类型ID、字段ID、哈希值算法以及类型的读/写函数。
要在C++中这样做,需要限定ignite::binary::BinaryType类型模板。
考虑下面的示例,使一个Java类可以在C++端进行操作:
package org.apache.ignite.examples;

public class CrossClass implements Binarylizable {
    private long id;

    private int idPart;

    public void readBinary(BinaryReader reader) throws BinaryObjectException {
        id = reader.readLong("id");
        idPart = reader.readInt("idPart");
    }

    public void writeBinary(BinaryWriter writer) throws BinaryObjectException {
        writer.writeLong("id", id);
        writer.writeInt("idPart", idPart);
    }
}
还需要在C++端定义一个对应的类,如下所示:
namespace ignite
{
  namespace binary
  {
    template<>
    struct BinaryType<CrossClass>
    {
      static int32_t GetTypeId()
      {
        return GetBinaryStringHashCode("CrossClass");
      }

      static void GetTypeName(std::string& name)
      {
        name = "CrossClass";
      }

      static int32_t GetFieldId(const char* name)
      {
        return GetBinaryStringHashCode(name);
      }

      static bool IsNull(const CrossClass& obj)
      {
        return false;
      }

      static void GetNull(CrossClass& dst)
      {
        dst = CrossClass();
      }

      static void Read(BinaryReader& reader, CrossClass& dst)
      {
        dst.id = reader.ReadInt64("id");
        dst.idPart = reader.ReadInt32("idPart");
      }

      static void Write(BinaryWriter& writer, const CrossClass& obj)
      {
        writer.WriteInt64("id", obj.id);
        writer.WriteInt32("idPart", obj.idPart);
      }
    };
  }
}
最后,在C++端和Java端的Spring配置文件中,还需要在BinaryConfiguration中增加如下的配置:
<?xml version="1.0" encoding="UTF-8"?>

<beans xmlns="http://www.springframework.org/schema/beans"
       xmlns:xsi="http://www.w3.org/2001/XMLSchema-instance"
       xsi:schemaLocation="http://www.springframework.org/schema/beans
        http://www.springframework.org/schema/beans/spring-beans.xsd">

    <bean id="ignite.cfg" class="org.apache.ignite.configuration.IgniteConfiguration">
	    ...
        <property name="binaryConfiguration">
            <bean class="org.apache.ignite.configuration.BinaryConfiguration">
                <property name="compactFooter" value="false"/>

                <property name="idMapper">
                    <bean class="org.apache.ignite.binary.BinaryBasicIdMapper">
                        <property name="lowerCase" value="true"/>
                    </bean>
                </property>

                <property name="nameMapper">
                    <bean class="org.apache.ignite.binary.BinaryBasicNameMapper">
                        <property name="simpleName" value="true"/>
                    </bean>
                </property>

                <property name="classNames">
                    <list>
                        <value>org.apache.ignite.examples.CrossClass</value>
                    </list>
                </property>
            </bean>
        </property>
		...
    </bean>
</beans>
注意
对于计划用于键的类型,以正确的方式实现GetTypeName()和GetTypeId()方法尤为重要。
注意
当属性lowerCase被设置为true时,C++函数GetBinaryStringHashCode()总是计算为BinaryBasicIdMapper的哈希。因此,如果要使用这个函数计算C++中的类型ID,那么一定要正确地配置BinaryBasicIdMapper。
# 6.对象生命周期
# 6.1.Ignite对象
使用Ignite公共API创建的Ignite对象(如Ignite或者Cache),是作为内部/底层对象的精简处理器实现的,可以安全快速地复制或按值传递给函数。它也是将Ignite对象从一个函数传递到另一个函数的推荐方法,因为只要存在至少一个处理器对象,底层对象就会存在。
// Fast and safe passing of the ignite::Ignite instance to the function.
// Here 'val' points to the same underlying node instance even though
// Ignite object gets copied on call.
// It's guarateed that the underlying object will live as long as 'val'
// object is alive.
void Foo(ignite::Ignite val)
{
  ...
}
# 6.2.用户对象
有时,应用可能需要在Ignite中使用自定义对象,而自定义对象的生命周期在编译时无法轻松确定。例如,在创建ContinuousQuery实例时,需要为持续查询提供本地监听器的实例,即CacheEntryEventListener。这时,不清楚应该是由Ignite还是应用来负责管理本地监听器的生命周期,并在不再需要时将其释放。
Ignite C++在这一点上非常灵活。它使用ignite::Reference类来解决自定义对象的所有权问题。请参考下面的代码,了解如何在实践中使用此类:
// Ignite function that takes a value of 'SomeType'.
void Foo(ignite::Reference<SomeType> val);

//...

// Defining an object.
SomeType obj1;

// Passing a simple reference to the function.
// Ignite will not get ownership over the instance.
// The application is responsible for keeping instance alive while
// it's used by Ignite and for releasing it once it is no longer needed.
Foo(ignite::MakeReference(obj1);

// Passing the object by copy.
// Ignite gets a copy of the object instance and manages
// its lifetime by itself.
// 'SomeType' is required to have a copy constructor.
foo(ignite::MakeReferenceFromCopy(obj1);

// Defining another object.
SomeType* obj2 = new SomeType;

// Passing object's ownership to the function.
// Ignite will release the object once it's no longer needed.
// The applicaiton must not use the pointer once it have been passed
// to Ignite as it might be released at any point of time.
foo(ignite::MakeReferenceFromOwningPointer(obj2);

std::shared_ptr<SomeType> obj3 = std::make_shared<SomeType>();

// Passing the object by smart pointer.
// In this case, Reference class behaves just like an underlying
// smart pointer type.
foo(ignite::MakeReferenceFromSmartPointer(obj3);
# 7.瘦客户端
瘦客户端是一种轻量级的Ignite连接模式。它不是在JVM进程中启动(根本不需要Java),不参与集群,从不保存任何数据(元数据除外)或执行计算。
它的作用是建立与一个或多个Ignite节点的套接字连接,并通过这些节点执行所有操作。
瘦客户端模式非常适合生命周期短和资源受限的应用,内存和CPU使用率极低。
# 7.1.安装
瘦客户端API与Ignite C++一起分发,并与完整的Ignite C++ API共享许多类,头和库,因此可以轻松地从一个API切换到另一个API。基本安装和构建过程与这里的描述是相同的。
# 7.2.要求
所有要求都与普通客户端相同,但Java部分除外:不需要Java。
# 7.3.配置服务端节点
在Ignite服务端节点默认是启用瘦客户端连接器的。在Java或Spring XML中设置IgniteConfiguration.clientConnectorConfiguration为null可以禁用。
连接器配置可以像下面这样进行调整:
<bean  class="org.apache.ignite.configuration.IgniteConfiguration">
    <property name="clientConnectorConfiguration">
        <bean class="org.apache.ignite.configuration.ClientConnectorConfiguration">
            <property name="host" value="myHost"/>
            <property name="port" value="11110"/>
            <property name="portRange" value="30"/>
        </bean>
    </property>
</bean>
# 7.4.接入集群
瘦客户端的API位于ignite::thinC++命名空间下。瘦客户端API的入口点是IgniteClient::Start(IgniteClientConfiguration)方法。可以使用IgniteClientConfiguration类来对客户端进行配置,例如要连接的服务端节点列表,安全凭据和连接的SSL/TLS配置。
注意
如果要使用认证或者安全连接,要确保服务端节点配置正确。
以下是如何启动一个新的瘦客户端实例的示例:
#include <ignite/thin/ignite_client.h>
#include <ignite/thin/ignite_client_configuration.h>
#include <ignite/thin/cache/ignite_client.h>

using namespace ignite::thin;

void TestClient()
{
  IgniteClientConfiguration cfg;

  //Endpoints list format is "<host>[port[..range]][,...]"
  cfg.SetEndPoints("127.0.0.1:11110,example.com:1234..1240");

  IgniteClient client = IgniteClient::Start(cfg);

  cache::CacheClient<int32_t, std::string> cacheClient =
    client.GetOrCreateCache<int32_t, std::string>("TestCache");

  cacheClient.Put(42, "Hello Ignite Thin Client!");
}
# 7.5.认证
如果服务端开启了身份认证,那么必须提供用户的凭据:
C++:
#include <ignite/thin/ignite_client.h>
#include <ignite/thin/ignite_client_configuration.h>
#include <ignite/thin/cache/ignite_client.h>

using namespace ignite::thin;

void TestClientWithAuth()
{
  IgniteClientConfiguration cfg;
  cfg.SetEndPoints("127.0.0.1:10800");

  // Use your own credentials here.
  cfg.SetUser("ignite");
  cfg.SetPassword("ignite");

  IgniteClient client = IgniteClient::Start(cfg);

  cache::CacheClient<int32_t, std::string> cacheClient =
    client.GetOrCreateCache<int32_t, std::string>("TestCache");

  cacheClient.Put(42, "Hello Ignite Thin Client with auth!");
}
服务端的Spring配置示例:
<bean  class="org.apache.ignite.configuration.IgniteConfiguration">

    <property name="authenticationEnabled" value="true"/>

    <property name="persistentStoreConfiguration">
        <bean class="org.apache.ignite.configuration.PersistentStoreConfiguration"/>
    </property>

    <property name="clientConnectorConfiguration">
        <bean class="org.apache.ignite.configuration.ClientConnectorConfiguration">
            <property name="host" value="127.0.0.1"/>
            <property name="port" value="10800"/>
            <property name="portRange" value="10"/>
        </bean>
    </property>

</bean>
# 7.6.性能考量
瘦客户端不是集群的一部分。因此关于集群及其数据分布的信息有限,再加上额外的网络延迟,瘦客户端上单个操作的延迟可能比普通客户端的延迟更差。虽然可以采取一些措施来改善瘦客户端延迟,例如最优映射,不过还是建议在单一键值操作方面使用批量操作(例如GetAll(),SetAll()),以在吞吐量方面获得最佳性能。
最优映射
Ignite C++瘦客户端尝试将数据请求发送到集群中的合适节点,以避免额外的网络延迟并提供最佳吞吐量和延迟。因此,C++瘦客户端在第一次创建CacheClient实例时就从端点列表中随机选取一个节点获取每个缓存的数据关联映射。
由于瘦客户端不是集群的一部分,因此无法保证此映射始终是最新的。要刷新映射,可以使用CacheClient::RefreshAffinityMapping方法。请注意如果集群发生变更,则需要调用此方法。
注意
确保在配置中列出所有集群节点的地址,如果集群节点地址不在列表中,则客户端将不会连接或向其发送请求。
下面是一个示例:
#include <ignite/thin/ignite_client.h>
#include <ignite/thin/ignite_client_configuration.h>
#include <ignite/thin/cache/ignite_client.h>

using namespace ignite::thin;

void TestClientWithAuth()
{
  IgniteClientConfiguration cfg;
  cfg.SetEndPoints("127.0.0.1:10800");

  IgniteClient client = IgniteClient::Start(cfg);

  cache::CacheClient<int32_t, std::string> cacheClient =
    client.GetOrCreateCache<int32_t, std::string>("TestCache");

  cacheClient.Put(42, "Hello Ignite Thin Client with auth!");

  cache.RefreshAffinityMapping();

  // Getting
  std::string val = cacheClient.Gett(42);
}
# 7.7.瘦客户端API
瘦客户端提供了完整Ignite C++ API的子集。它还在开发中,社区计划在未来支持普通客户端中的大多数API。
# 8.性能提示
Ignite C++内存数据网格性能和吞吐量在很大程度上取决于使用的功能和设置。在大多数场景中,只需调整缓存配置即可优化缓存性能。
# 8.1.禁用内部事件通知
Ignite有丰富的事件系统来向用户通知各种各样的事件,包括缓存的修改、退出、压缩、拓扑的变化以及很多其它的。因为每秒钟可能产生上千的事件,它会对系统产生额外的负载,这会导致显著地性能下降。因此,强烈建议只有应用逻辑必要时才启用这些事件。事件通知默认是禁用的:
XML:
<bean class="org.apache.ignite.configuration.IgniteConfiguration">
    ...
    <!-- Enable only some events and leave other ones disabled. -->
    <property name="includeEventTypes">
        <list>
            <util:constant static-field="org.apache.ignite.events.EventType.EVT_TASK_STARTED"/>
            <util:constant static-field="org.apache.ignite.events.EventType.EVT_TASK_FINISHED"/>
            <util:constant static-field="org.apache.ignite.events.EventType.EVT_TASK_FAILED"/>
        </list>
    </property>
    ...
</bean>
# 8.2.关闭备份
如果使用了分区缓存,而且数据丢失并不是关键(比如,当有一个备份缓存存储时),可以考虑禁用分区缓存的备份。当备份启用时,缓存引擎会为每个条目维护一个远程拷贝,这需要网络交换,因此是耗时的。要禁用备份,可以使用如下的配置:
XML:
<bean class="org.apache.ignite.configuration.IgniteConfiguration">
    ...
    <property name="cacheConfiguration">
        <bean class="org.apache.ignite.configuration.CacheConfiguration">
            ...
            <!-- Set cache mode. -->
            <property name="cacheMode" value="PARTITIONED"/>
            <!-- Set number of backups to 0-->
            <property name="backups" value="0"/>
            ...
        </bean>
    </property>
</bean>
可能的数据丢失
如果没有启用分区缓存的备份,会丢失缓存在故障节点的所有数据,这对于缓存临时数据或者数据可以通过某种方式重建可能是可以接受的。禁用备份之前一定要确保对于应用来说丢失数据不是关键的。
# 8.3.调整退出策略
默认是禁用退出的。如果确实需要使用退出来确保缓存中的数据不会超出允许的内存限制,可以考虑选择适当的退出策略。设置最大值为100000条目的LRU退出策略的示例如下所示:
<bean class="org.apache.ignite.cache.CacheConfiguration">
    ...
    <property name="evictionPolicy">
        <!-- LRU eviction policy. -->
        <bean class="org.apache.ignite.cache.eviction.lru.LruEvictionPolicy">
            <!-- Set the maximum cache size to 1 million (default is 100,000). -->
            <property name="maxSize" value="1000000"/>
        </bean>
    </property>
    ...
</bean>
无论使用哪种退出策略,缓存性能都取决于退出策略配置的缓存中的最大条目数量,即如果缓存大小超过此限制,则退出就会开始。
# 8.4.调整数据再平衡
当新节点加入集群时,现有节点会将作为部分键的主节点或备份节点的所有权转移给新的节点,以便在网格中始终保持数据的均衡。这需要额外的资源并影响缓存的性能。要解决此问题,需要考虑调整以下参数:
- 配置合适的再平衡批量大小。默认值为512KB,这意味着再平衡消息大约为512KB。不过可能需要根据网络性能将此值设置为更高或更低;
- 配置再平衡限流以给CPU减负:如果数据集很大并且要发送大量消息,则CPU或网络可能会过度消耗,这可能会降低应用的性能。这时就要对数据再平衡进行限流,这有助于调整再平衡消息之间等待的时间,以确保再平衡过程不会对性能产生负面影响。注意,在再平衡过程中应用将继续正常运行;
- 配置再平衡线程池大小:与前一点相反,有时可能需要通过增加更多CPU核心来更快地进行再平衡。这可以通过增加再平衡线程池中的线程数来完成(默认线程池中只有2个线程)。
以下是在缓存配置中设置所有上述参数的示例:
<bean class="org.apache.ignite.configuration.IgniteConfiguration">
    ...
    <property name="cacheConfiguration">
        <bean class="org.apache.ignite.configuration.CacheConfiguration">
            <!-- Set rebalance batch size to 1 MB. -->
            <property name="rebalanceBatchSize" value="#{1024 * 1024}"/>

            <!-- Explicitly disable rebalance throttling. -->
            <property name="rebalanceThrottle" value="0"/>

            <!-- Set 4 threads for rebalancing. -->
            <property name="rebalanceThreadPoolSize" value="4"/>
            ...
        </bean>
    </property>
</bean>
# 8.5.配置线程池
Ignite默认将其主线程池大小设置为可用CPU核数的2倍。在大多数情况下,每个核心持有2个线程将使应用的性能更快,因为上下文切换将更少,CPU缓存也会更好地工作。但是,如果不希望作业阻塞I/O或任何其它原因,增加线程池大小可能也是有意义的,以下是配置线程池的示例:
XML:
<bean class="org.apache.ignite.configuration.IgniteConfiguration">
    ...
    <!-- Configure internal thread pool. -->
    <property name="publicThreadPoolSize" value="64"/>

    <!-- Configure system thread pool. -->
    <property name="systemThreadPoolSize" value="32"/>
    ...
</bean>
# 8.6.批量处理消息
尽量使用键或值集合的API方法,而不是逐个传递。这将减少通过网络传递的消息量,并可能显著提高性能。
# 8.7.调整垃圾收集
如果由于垃圾收集(GC)而导致吞吐量出现峰值,则应调整JVM参数。实践证明,以下JVM设置可提供相当平滑的吞吐量,而不会出现大的峰值:
-XX:+UseParNewGC
-XX:+UseConcMarkSweepGC
-XX:+UseTLAB
-XX:NewSize=128m
-XX:MaxNewSize=128m
-XX:MaxTenuringThreshold=0
-XX:SurvivorRatio=1024
-XX:+UseCMSInitiatingOccupancyOnly
-XX:CMSInitiatingOccupancyFraction=60
集群化 →