# Ignite Web控制台
# 1.Ignite Web控制台
Ignite Web控制台是一个交互式的配置向导、管理和监控工具。它可以:
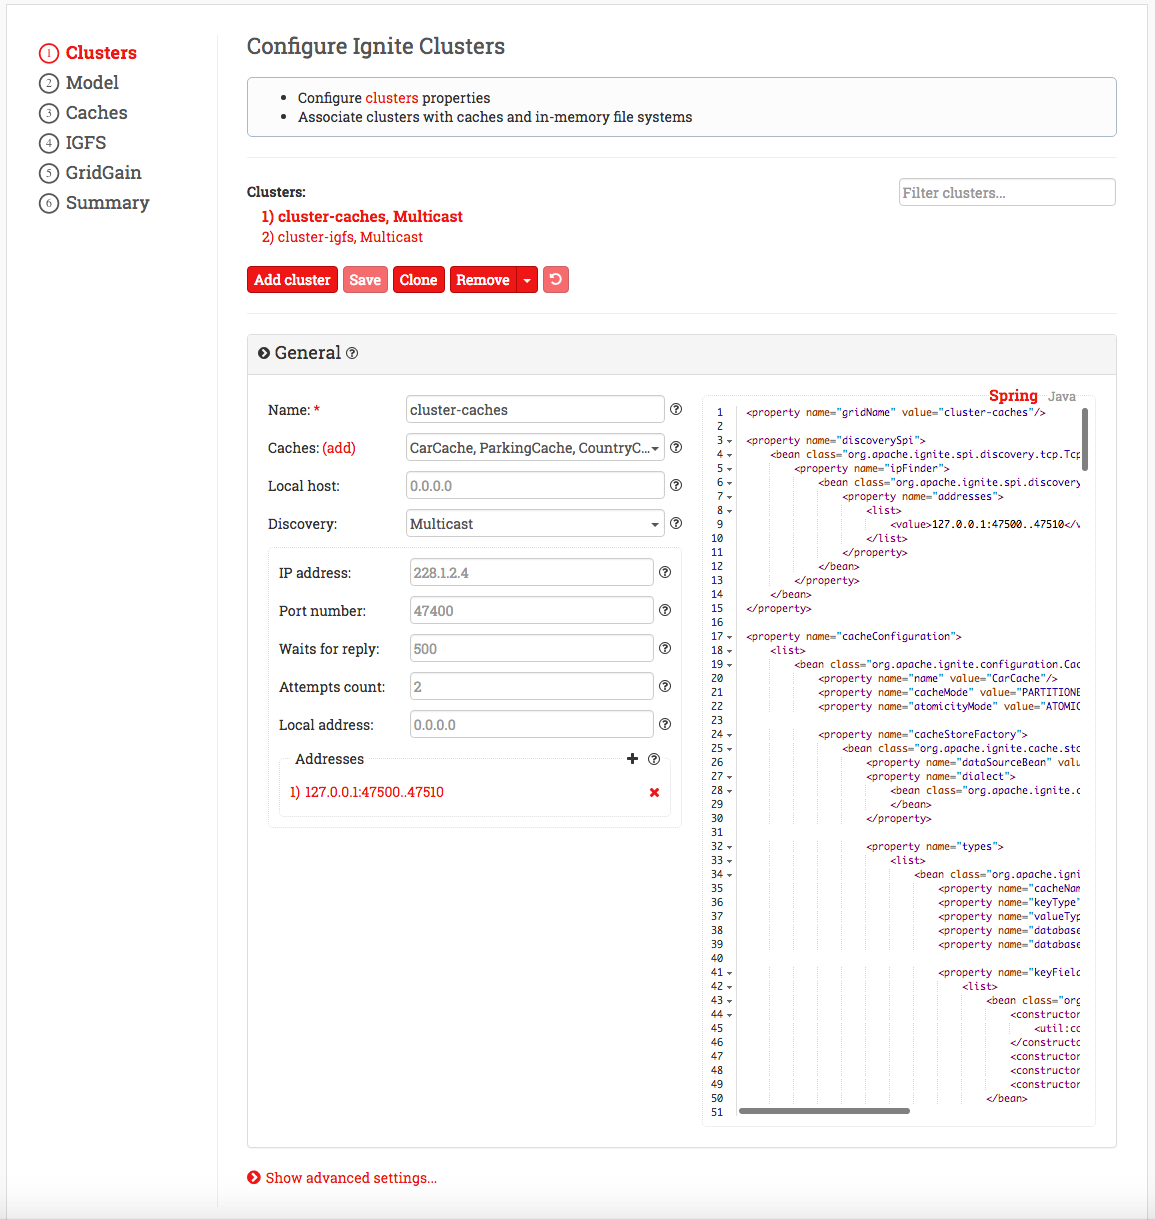
- 创建和下载Ignite集群使用的各种配置:
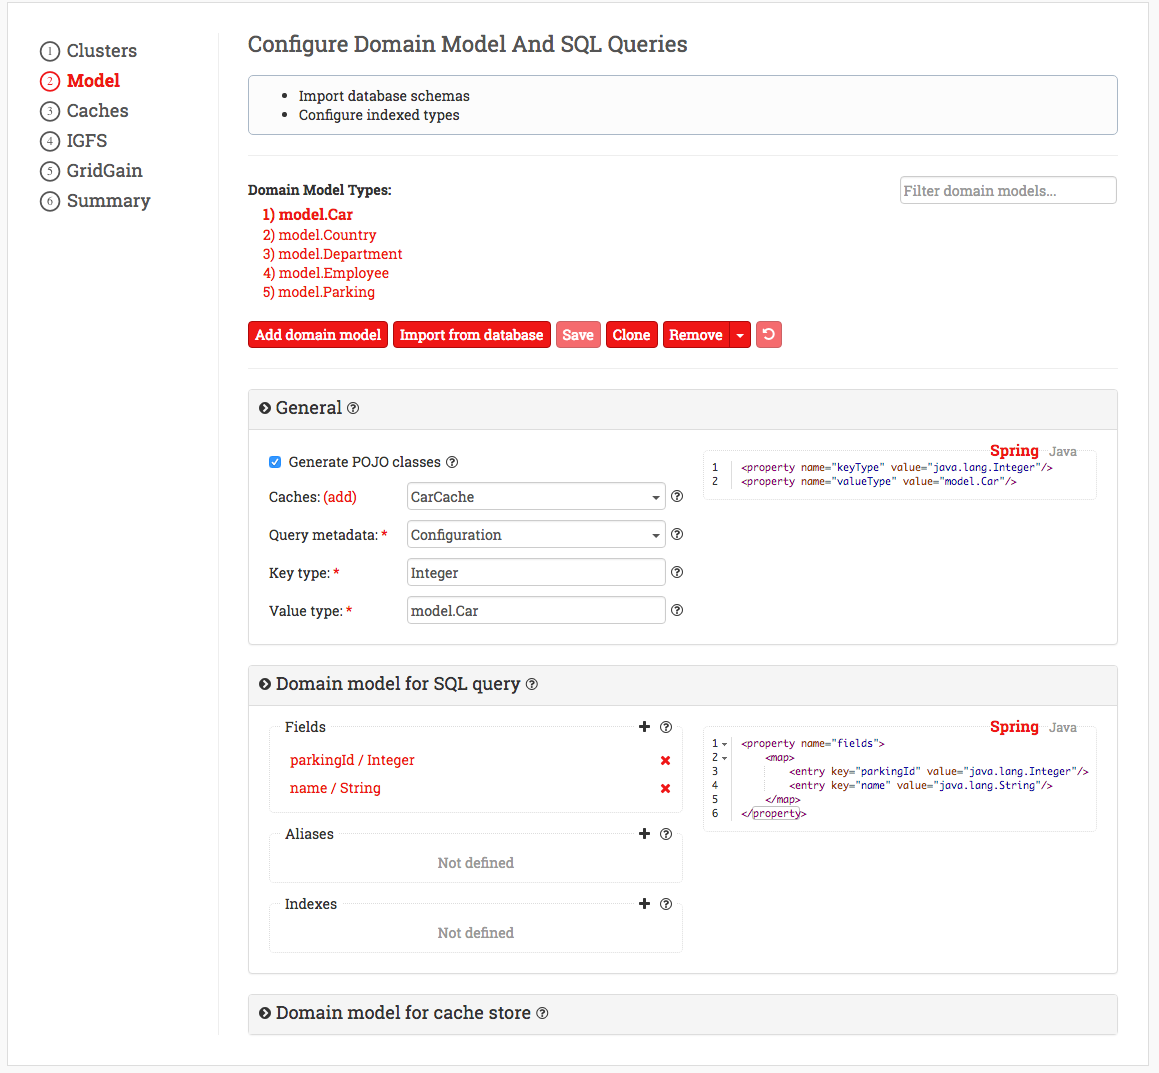
- 从任意RDBMS的模式中自动化构造Ignite的SQL元数据:
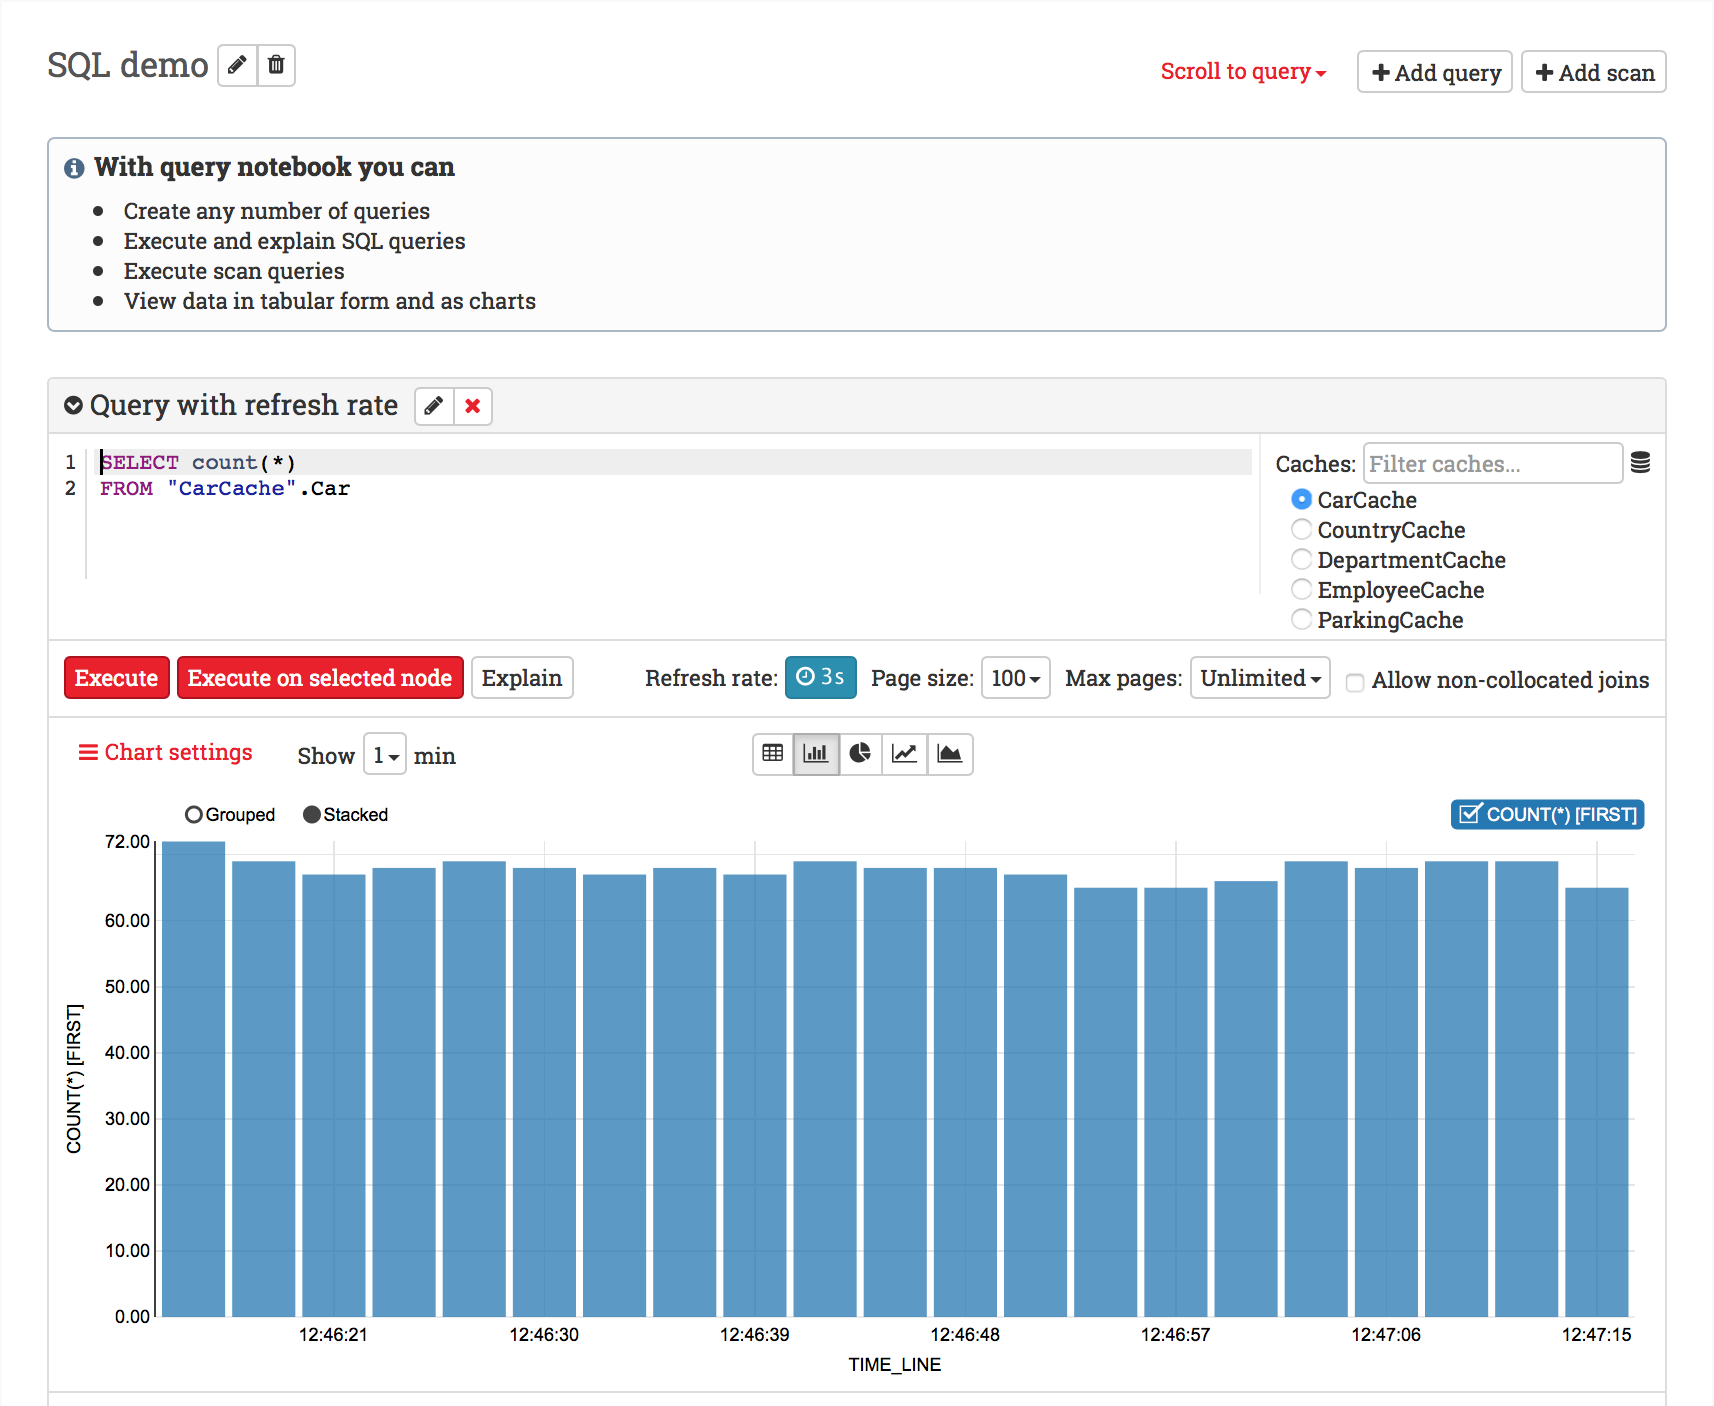
- 在内存缓存中执行SQL查询,以及查看执行计划。
Ignite的Web控制台,是一个可以部署在系统环境中的Web应用。它可以配置所有的集群属性,从数据库中导入模式用于与持久化存储集成。它可以接入特定的数据库然后生成所有必要的OR映射配置(XML以及纯Java)以及Java领域模型POJOs。Web控制台还有集群监控的功能(使用GridGain单独的插件实现),它会显示各种缓存以及节点的指标数据,比如CPU和堆的使用情况等。
# 2.入门
# 2.1.安装
Ignite的Web控制台是一个WEB应用,需要构建、打包然后部署在自己的环境上。另外,它需要安装NodeJS,MongoDB以及Ignite的Web代理。
参照构建和部署章节的文档,然后按照步骤操作即可。
一个免费已部署的Ignite Web控制台实例
在构建和部署自己的本地Ignite Web控制台实例之前,可以看一下一个免费已部署的Web控制台实例,利用这个站点,花几分钟就可以大概了解控制台的已有功能。
Ignite的Web控制台启动运行之后,需要按照下面章节的步骤配置并且启动Web代理,代理是Ignite的Web控制台和Ignite集群之间的媒介。
# 2.2.Ignite Web代理
Ignite的Web代理是一个独立的Java应用,它可以建立Ignite集群与Web控制台之间的连接。Web Agent与集群节点间采用REST接口进行通信,而与Web控制台之间采用WebSocket进行通信。

举例来说,Ignite的Web Agent功能如下:
- Web控制台与Ignite集群之间执行SQL查询的代理;
- Web控制台与RDBMS之间的代理。

使用
Ignite Web代理的zip压缩包中的ignite-web-agent.{sh|bat}脚本可用于启动这个代理。一定要满足下面的必要条件,使得代理可以在Ignite集群和Ignite Web控制台之间建立连接。
1.为了与Web代理通信,Ignite节点需要开启REST服务模式(将ignite-rest-http文件夹从lib/optional/移动到lib/中)。如果是从IDE启动节点,那么需要将下面的依赖加入pom.xml文件;
<dependency>
    <groupId>org.apache.ignite</groupId>
    <artifactId>ignite-rest-http</artifactId>
    <version>{ignite.version}</version>
</dependency>
2.配置Web代理的serverURI属性,将其指向Ignite节点的REST服务的URL,代理默认会连接http://localhost:8080。
启动Web代理
在终端中,可以使用ignite-web-agent.{sh|bat}脚本从Web代理的根目录中启动Web代理,如下:
$ ./ignite-web-agent.sh
配置
配置文件
Ignite的Web代理默认会试图从default.properties文件中加载配置。这个文件的内容需要遵循一个简单的基于行的格式。
可用的属性名包括:tokens,server-uri,node-uri,driver-folder。
tokens=1a2b3c4d5f,2j1s134d12
serverURI=https://console.example.com:3001
命令行参数
要获得帮助,可以在终端中执行ignite-web-agent.{sh|bat} -h或者ignite-web-agent.{sh|bat} --help。
可用的属性如下:
-h,--help:输出帮助信息;-c,--config:配置文件路径;-d,--driver-folder:JDBC驱动所在文件夹路径,默认值是./jdbc-drivers;-n,--node-uri:要接入的Ignite REST服务端的URI,默认值是http://localhost:8080;-s,--server-uri:要接入的Ignite Web控制台的URI,默认值是http://localhost:3001;-t,--tokens:用户的安全令牌。
代理配置
代理可以通过将系统属性、JVM_OPTS环境变量的方式传给Web代理。
在如下文档中可以找到详细的描述: http://docs.oracle.com/javase/7/docs/api/java/net/doc-files/net-properties.html。
HTTP
http.proxyHost:代理服务器的主机名或者地址;
http.proxyPort:代理服务器的端口号。
如果代理需要认证,还需要提供如下的系统属性:
http.proxyUsername:用户名;
http.proxyPassword:密码。
Shell:
JVM_OPTS="-Dhttp.proxyHost=<proxy-hostname> -Dhttp.proxyPort=<proxy-port> -Dhttp.proxyUsername=<proxy-username> -Dhttp.proxyPassword=<proxy-password>" ./ignite-web-agent.sh
CMD:
set JVM_OPTS=-Dhttp.proxyHost=<proxy-hostname> -Dhttp.proxyPort=<proxy-port> -Dhttp.proxyUsername=<proxy-username> -Dhttp.proxyPassword=<proxy-password>
./ignite-web-agent.bat
HTTPS
https.proxyHost:代理服务器的主机名或者地址;
https.proxyPort:代理服务器的端口号。
如果代理需要认证,还需要提供如下的系统属性:
https.proxyUsername:用户名;
https.proxyPassword:密码。
Shell:
JVM_OPTS="-Dhttps.proxyHost=<proxy-hostname> -Dhttps.proxyPort=<proxy-port> -Dhttps.proxyUsername=<proxy-username> -Dhttps.proxyPassword=<proxy-password>" ./ignite-web-agent.sh
CMD:
set JVM_OPTS=-Dhttps.proxyHost=<proxy-hostname> -Dhttps.proxyPort=<proxy-port> -Dhttps.proxyUsername=<proxy-username> -Dhttps.proxyPassword=<proxy-password>
./ignite-web-agent.bat
SOCKS
socksProxyHost:代理服务器的主机名或者地址;
socksProxyPort:代理服务器的端口号。
如果代理需要认证,还需要提供如下的系统属性:
java.net.socks.username:用户名;
java.net.socks.password:密码。
Shell:
JVM_OPTS="-DsocksProxyHost=<proxy-hostname> -DsocksProxyPort=<proxy-port> -Djava.net.socks.username=<proxy-username> -Djava.net.socks.password=<proxy-password>" ./ignite-web-agent.sh
CMD:
set JVM_OPTS= -DsocksProxyHost=<proxy-hostname> -DsocksProxyPort=<proxy-port> -Djava.net.socks.username=<proxy-username> -Djava.net.socks.password=<proxy-password>
./ignite-web-agent.bat
# 3.构建和部署
# 3.1.要求
为了在本地部署Ignite的Web控制台,需要先安装:
- MongoDB(版本>=3.2.x <=3.4.15),具体可以参照文档;
- NodeJS(8.0.0以上版本),可以从https://nodejs.org/en/download/current针对具体的OS找到相对应的安装文件。
开始之前需要下载依赖:
- 后台:
cd $IGNITE_HOME/modules/web-console/backend
npm install --no-optional
- 前台:
cd $IGNITE_HOME/modules/web-console/frontend
npm install --no-optional
# 3.2.构建Ignite Web代理
要从源代码构建Ignite的Web代理,需要在$IGNITE_HOME文件夹中执行如下的命令:
mvn clean package -pl :ignite-web-agent -am -P web-console -DskipTests=true
构建过程完成后,会在$IGNITE_HOME/modules/web-console/web-agent/taget中找到ignite-web-agent-x.x.x.zip。
# 3.3.在开发模式中运行Ignite的Web控制台
要在开发模式中运行Ignite的Web控制台,可以按照如下步骤操作:
- 配置MongoDB以服务的模式运行,或者在终端中执行
mongod命令来启动MongoDB; - 将
ignite-web-agent-x.x.x.zip复制到$IGNITE_HOME/modules/web-console/backend/agent_dists文件夹; - 在终端中切换到
$IGNITE_HOME/modules/web-console/backend,如果需要,运行npm install --no-optional(如果依赖改变),然后运行npm start启动后台; - 在另一个终端中切换到
$IGNITE_HOME/modules/web-console/frontend,如果需要,运行npm install --no-optional(如果依赖改变),然后运行npm start以开发模式启动webpack; - 在浏览器中打开:
http://localhost:9000; - 在入门章节中可以看到如何将部署的控制台接入一个远程集群,或者如何在远程主机上访问控制台。
# 3.4.在生产模式中运行Ignite的Web控制台
前提条件
- 安装了Apache HTTP Server的2.2及更新的版本或者nginx;
- 为Ignite的Web控制台分配一个专用的主机名(可选)。
启动后台
- 配置MongoDB以服务的模式运行,或者在终端中执行
mongod命令来启动MongoDB; - 将
ignite-web-agent-x.x.x.zip复制到$IGNITE_HOME/modules/web-console/backend/agent_dists文件夹; - 在终端中切换到
$IGNITE_HOME/modules/web-console/backend; - 运行
npm start启动后台。
注意
如果希望以守护进程模式运行后台,需要为NodeJS应用使用进程管理器:pm2,forever等。
构建前台
- 在另一个终端中切换到
$IGNITE_HOME/modules/web-console/frontend; - 运行
npm run build为Web服务器生成文件(html、js、css); - 生成的文件位于
$IGNITE_HOME/modules/web-console/frontend/build。
配置Apache HTTP Server
- 将
$IGNITE_HOME/modules/web-console/frontend/build文件夹的内容复制到$IGNITE_HOME/modules/web-console/frontend/build; - 如果Apache HTTP Server为多个站点提供服务,那么需要将下面的虚拟主机添加到
/etc/httpd/conf/httpd.conf: httpd.conf:
<VirtualHost *:80>
  ServerName www.WEB_CONSOLE_HOSTNAME
  ServerAlias WEB_CONSOLE_HOSTNAME

  DocumentRoot "/var/www/web-console-static"

  RewriteEngine on

  <Directory "/var/www/web-console-static">
  AllowOverride All
  Allow from all
  </Directory>

  ProxyRequests off

  <proxy *>
  Order deny,allow
  Allow from all
  </proxy>

  ProxyPreserveHost On
  RequestHeader set Host "WEB_CONSOLE_HOSTNAME"

  RewriteCond %{DOCUMENT_ROOT}%{REQUEST_URI} -f
  RewriteRule ^ - [L]

  RewriteCond %{HTTP:UPGRADE} ^WebSocket$ [NC]
  RewriteCond %{HTTP:CONNECTION} ^Upgrade$ [NC]
  RewriteRule .* ws://localhost:3000%{REQUEST_URI} [P,L]

  RewriteCond %{REQUEST_URI} ^/agents/.* [OR]
  RewriteCond %{REQUEST_URI} ^/socket.io/.*
  RewriteRule ^ http://localhost:3000%{REQUEST_URI} [P,L]

  RewriteCond %{REQUEST_URI} ^/api/v1/.*$
  RewriteRule ^/api/v1/(.*)$ http://localhost:3000/$1 [P,L]

  RewriteRule ^ /index.html [L]
</VirtualHost>
注意
上面文件中的WEB_CONSOLE_HOSTNAME,需要替换为部署Web控制台实例的机器的主机名。
如果Apache HTTP Server还用于部署的Web控制台,那么下面的配置也需要添加到/etc/httpd/conf/httpd.conf:
httpd.conf:
ServerName localhost

DocumentRoot "/var/www/web-console-static"

RewriteEngine on

<Directory "/var/www/web-console-static">
AllowOverride All
Allow from all
</Directory>

ProxyRequests off

<proxy *>
Order deny,allow
Allow from all
</proxy>

ProxyPreserveHost On
RequestHeader set Host "EXTERNAL_SERVER_IP"

RewriteCond %{DOCUMENT_ROOT}%{REQUEST_URI} -f
RewriteRule ^ - [L]

RewriteCond %{REQUEST_URI} ^/agents/.* [OR]
RewriteCond %{REQUEST_URI} ^/socket.io/.*
RewriteRule ^ http://localhost:3000%{REQUEST_URI} [P,L]

RewriteCond %{HTTP:UPGRADE} ^WebSocket$ [NC]
RewriteCond %{HTTP:CONNECTION} ^Upgrade$ [NC]
RewriteRule .* ws://localhost:3000%{REQUEST_URI} [P,L]

RewriteCond %{REQUEST_URI} ^/api/v1/.*$
RewriteRule ^/api/v1/(.*)$ http://localhost:3000/$1 [P,L]

RewriteRule ^ /index.html [L]
注意
上面的EXTERNAL_SERVER_IP,需要替换为部署Web控制台实例的机器的主机名。
执行sudo apachectl restart重启Apache HTTP Server以使配置生效。
打开浏览器,根据部署类型打开下面的地址中的一个:http://WEB_CONSOLE_HOSTNAME或http://EXTERNAL_SERVER_IP。
配置nginx HTTP Server
- 将
$IGNITE_HOME/modules/web-console/frontend/build文件夹中的内容复制到/var/www/web-console-static; - 如果一个nginx HTTP Server为多个站点提供服务,需要为虚拟主机创建一个配置。比如创建一个配置文件
/etc/nginx/conf.d/web-console.conf,内容如下: /etc/nginx/conf.d/web-console.conf:
upstream backend-api {
  server localhost:3000;
}

server {
  listen 80;
  server_name EXTERNAL_SERVER_IP WEB_CONSOLE_HOSTNAME;

  set $ignite_console_dir /var/www/web-console-static;

  root $ignite_console_dir;

  error_page 500 502 503 504 /50x.html;

  location / {
    try_files $uri /index.html = 404;
  }

  location /api/v1 {
    rewrite /api/v1/(.*) /$1 break;
    proxy_set_header Host $http_host;
    proxy_pass http://backend-api;
  }

  location /socket.io {
    proxy_set_header Upgrade $http_upgrade;
    proxy_set_header Connection "upgrade";
    proxy_http_version 1.1;
    proxy_set_header X-Forwarded-For $proxy_add_x_forwarded_for;
    proxy_set_header Host $host;
    proxy_pass http://backend-api;
  }

  location /agents {
    proxy_set_header Upgrade $http_upgrade;
    proxy_set_header Connection "upgrade";
    proxy_http_version 1.1;
    proxy_set_header X-Forwarded-For $proxy_add_x_forwarded_for;
    proxy_set_header Host $host;
    proxy_pass http://backend-api;
  }

  location = /50x.html {
    root $ignite_console_dir/error_page;
  }
}
注意
上面的EXTERNAL_SERVER_IP,需要替换为部署Web控制台实例的机器的主机名。
WEB_CONSOLE_HOSTNAME,需要替换为部署Web控制台实例的机器的主机名。
执行sudo service nginx restart重启Nginx HTTP Server以使配置生效。
打开浏览器,根据部署类型打开下面的地址中的一个:http://WEB_CONSOLE_HOSTNAME或http://EXTERNAL_SERVER_IP。
问题解决
如果在浏览器中出现了Forbidden这样的错误,那么需要检查操作系统中所有的安全策略都配置正确了。
# 4.演示模式
# 4.1.概述
可以使用Web控制台的演示模式来研究和评估它有关配置和管理集群的各种功能,这个模式中,可以检查预定义的集群、缓存以及领域模型,它还启动了一个内置的H2数据库实例,可以执行各种SQL查询以及查看数据报表,还可以监控各种缓存和节点的指标,比如集群的CPU和堆使用量等。
# 4.2.启动演示模式
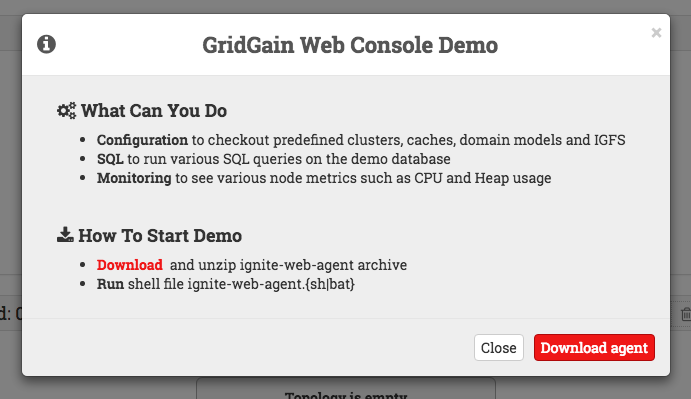
要开启演示模式,需要点击控制台顶部菜单的Start demo按钮。
- 下载然后解压Ignite的Web代理;
- 打开命令行终端,假定当前在
ignite-web-agent目录,运行如下的命令:
./ignite-web-agent.sh
 启动Web代理之后,回到浏览器中就可以:
配置集群和缓存
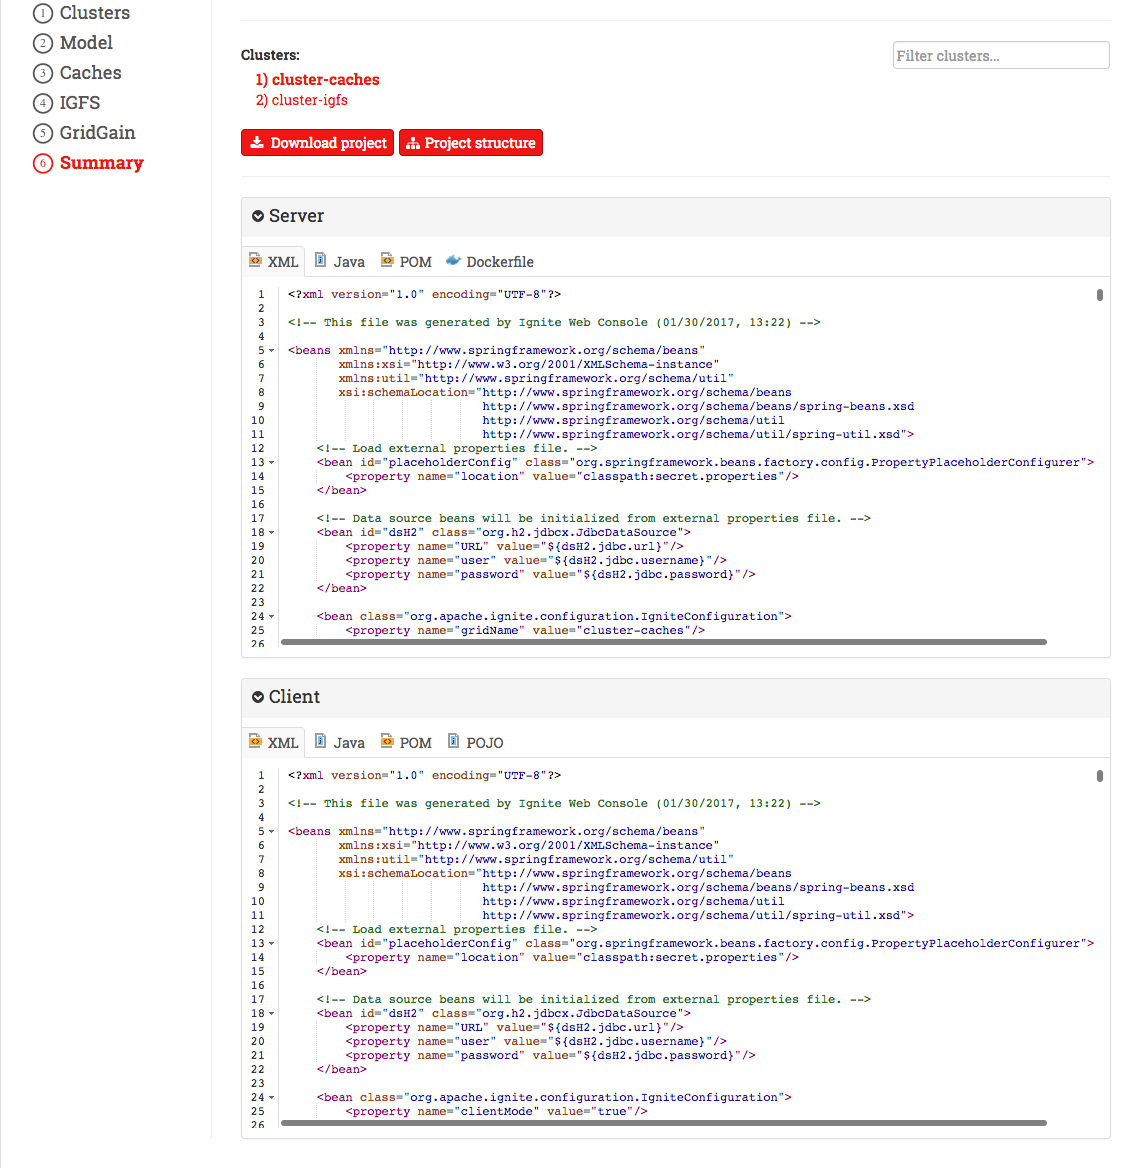
点击控制台侧边栏上的Clusters和Caches,可以查看和设定Ignite的配置参数,点击Summary可以下载这些配置的XML和Java格式文件,这个页面还可以下载一个可用的基于Maven的工程。
导入领域模型
演示模式中,已连接的Web代理中已经启动了H2数据库实例,如下方法可以验证:
- 打开控制台的
Domain model界面; - 点击
Import from database,可以看到一个描述Demo的模态窗口; - 点击
Next会看到一个可用模式的列表; - 点击
Next会看到一个可用表的列表; - 点击
Next会看到导入的选项; - 选择之后点击
Save。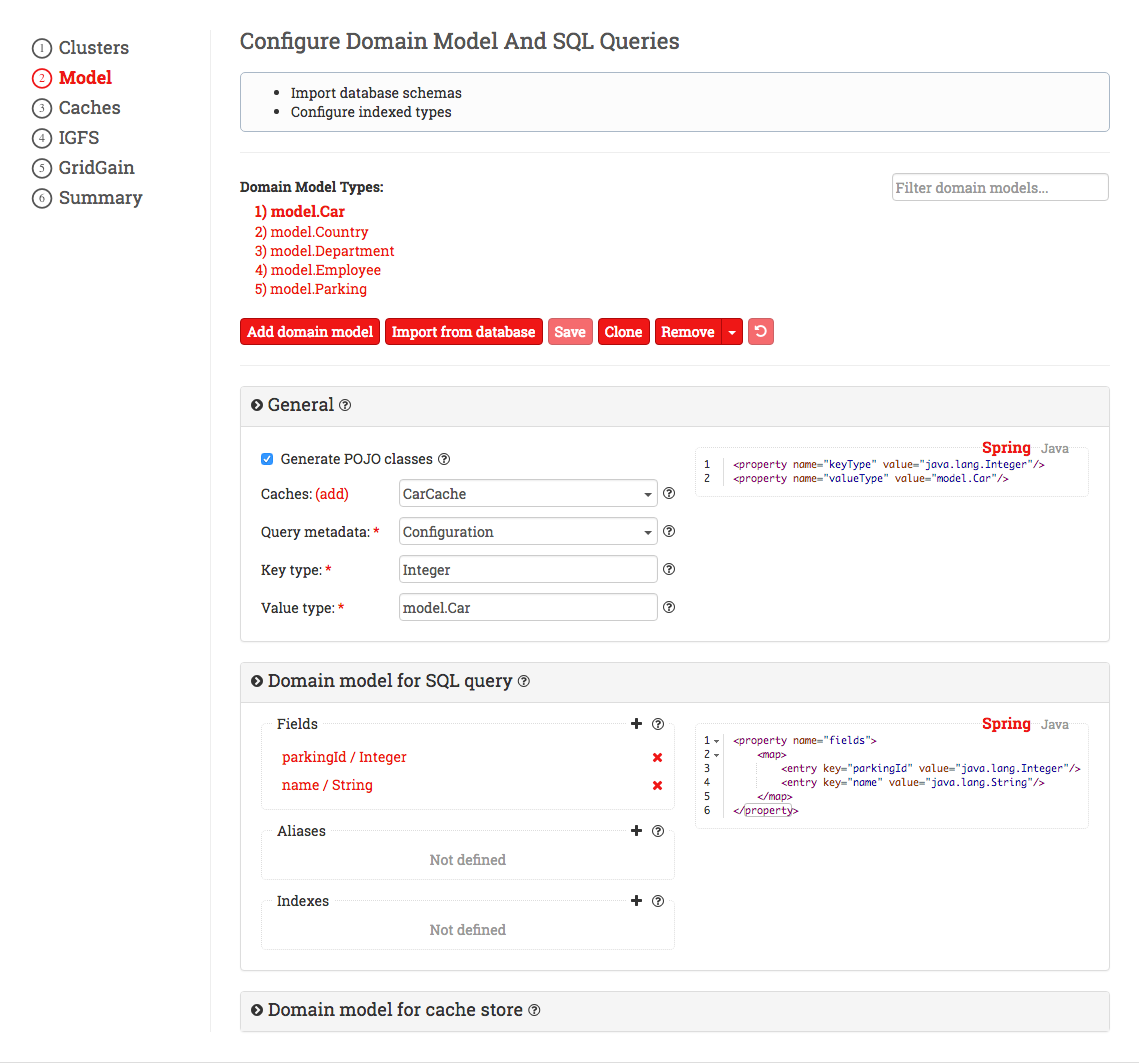
执行SQL查询
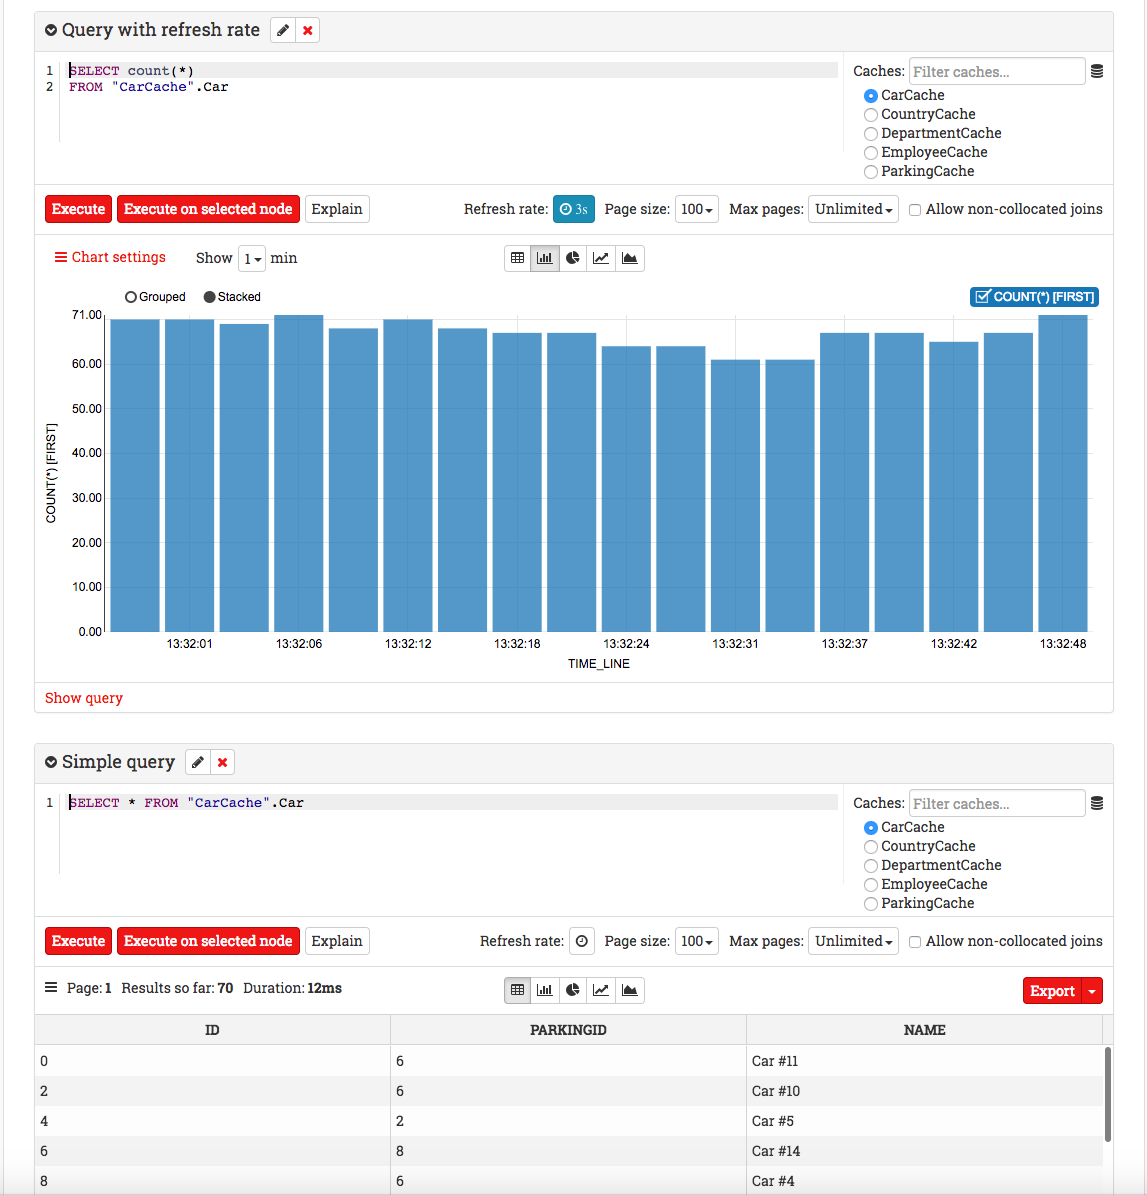
该模式中,会启动一个客户端和三个服务端节点,会创建一些缓存并且注入了数据,如下方法可以验证:
- 点击Web控制台顶层菜单的
Queries选项卡; - 会打开预配置
SQL Demo查询的笔记本; - 在demo数据库中,可以执行SQL查询,其中有表:
Country, Department, Employee, Parking, Car;
比如输入如下的SQL:
SELECT p.name, count(*) AS cnt FROM "ParkingCache".Parking p`
`INNER JOIN "CarCache".Car c ON (p.id) = (c.parkingId)`
`GROUP BY P.NAME
- 点击
Execute按钮,会获得表中的若干数据; - 点击
charts按钮,可以看到自动生成的图表。
# 5.Docker部署
在本地环境中部署Ignite Web控制台的最简单方式是使用控制台的Docker镜像,如果基于Docker的方式不可行,那么可以参照构建和部署章节的内容。
# 5.1.启动Web代理
如入门章节所说,要在Ignite集群和Web控制台之间建立连接,需要首先配置并且启动Ignite的Web代理,下面是步骤:
1.启动开启REST服务的Ignite节点,将ignite-rest-http目录从IGNITE_HOME/libs/optional/移动到IGNITE_HOME/lib/,或者如果从IDE启动节点,则需要将下面的依赖加入pom.xml文件:
<dependency>
    <groupId>org.apache.ignite</groupId>
    <artifactId>ignite-rest-http</artifactId>
    <version>{ignite.version}</version>
</dependency>
2.在ignite-web-agent-{version}目录下的default.properties文件中,需要配置Web代理的serverURI属性,这样它就可以访问Ignite节点的REST服务。如果不配置,代理默认会连接http://localhost:8080。代理会尝试从default.properties文件中加载配置参数,该文件的内容格式比较简单,有效的属性名为:tokens,server-uri,node-uri,driver-folder。
default.properties:
tokens=1a2b3c4d5f,2j1s134d12
serverURI=https://console.example.com:3001
3.在终端中,在Web代理的目录中使用ignite-web-agent.{sh|bat}脚本启动Web代理,如下:
$ ./ignite-web-agent.sh
# 5.2.部署Web控制台
下面是部署的完整步骤:
- 拉取Ignite Web控制台的Docker镜像:
docker pull apacheignite/web-console-standalone; - 启动Web控制台:
docker run -d -p 80:80 -v <host_absolute_path>:/var/lib/mongodb --name web-console-standalone apacheignite/web-console-standalone。
注意
- 需要使用
sudo来运行docker命令; - 如果
80端口已被占用,那么容器端口需要映射到其它的可用端口。比如,下面的命令将容器的80端口绑定的宿主机的8080端口:sudo docker run -d -p 8080:80 -v <host_absolute_path>:/var/lib/mongodb --name web-console-standalone apacheignite/web-console-standalone; <host_absolute_path>:是宿主机中MongoDB创建数据库文件的路径。这个文件夹应该在docker运行前创建好,打开Docker->Preferences->File Sharing然后在那里创建目录,或者使用其它的方式也行。
- 在浏览器中打开Web控制台:
http://localhost或者http://host-ip-of-computer-with-docker-image,如果默认端口有变,那么地址为:http://localhost:<host_port>。
# 5.3.更新到新版
Docker更新容器的方式如下:
docker pull apacheignite/web-console-standalone
docker stop apacheignite/web-console-standalone
docker rm apacheignite/web-console-standalone
docker run -d -p 80:80 -v <host_absolute_path>:/var/lib/mongodb --name web-console-standalone apacheignite/web-console-standalone
# 5.4.为Web控制台添加HTTPS支持
- 创建
web-console.conf文件,内容如下:
web-console.conf:
upstream backend-api {
  server localhost:3000;
}

# redirect http to https
server {
  listen 80 default_server;

  return 301 https://<your-web-console-domain-name>$request_uri;
}

# https server settings
server {
  listen 443 ssl;
  server_name _;
  ssl_certificate     server.crt;
  ssl_certificate_key server.key;
  ssl_protocols       SSLv3 TLSv1 TLSv1.1 TLSv1.2;
  ssl_ciphers         HIGH:!aNULL:!MD5;

  set $ignite_console_dir /opt/web-console/static;

  root $ignite_console_dir;

  error_page 500 502 503 504 /50x.html;

  location / {
    try_files $uri /index.html = 404;
  }

  location /api/v1 {
    proxy_set_header Host $http_host;
    proxy_pass http://backend-api;
  }

  location /socket.io {
    proxy_set_header Upgrade $http_upgrade;
    proxy_set_header Connection "upgrade";
    proxy_http_version 1.1;
    proxy_set_header X-Forwarded-For $proxy_add_x_forwarded_for;
    proxy_set_header Host $host;
    proxy_pass http://backend-api;
  }

  location /agents {
    proxy_set_header Upgrade $http_upgrade;
    proxy_set_header Connection "upgrade";
    proxy_http_version 1.1;
    proxy_set_header X-Forwarded-For $proxy_add_x_forwarded_for;
    proxy_set_header Host $host;
    proxy_pass http://backend-api;
  }

  location = /50x.html {
    root $ignite_console_dir/error_page;
  }
}
注意
将web-console.conf中的占位符<your-web-console-domain-name>替换为自己的域名,以便浏览器正确地从HTTP跳转到HTTPS。
- 准备名为
server.crt,server.key的证书文件; - 启动Web控制台:
docker run -d -p 80:80 -p 443:443 -v <host_absolute_path>:/var/lib/mongodb -v <web-console.conf_absolute_path>:/etc/nginx/web-console.conf -v <server.crt_absolute_path>:/etc/nginx/server.crt -v < server.key_absolute_path>:/etc/nginx/server.key --name web-console-standalone apacheignite/web-console-standalone
# 6.Kubernetes安装
如果要在Kubernetes环境中安装Ignite的Web控制台,需要将4个组件部署为Docker镜像:
- MongoDB(Web控制台使用MongoDB作为存储层);
- Web控制台后端;
- Web控制台前端;
- Web代理。
以下部分将介绍完成安装这些组件所需的步骤。
# 6.1.安装MongoDB
下面的配置定义了MongoDB安装所需的参数,它配置了如下的资源:
- 名为
mongodb的命名空间; - 名为
mongodb-claim0的持久化存储; - 运行MongoDB3.4版本的环境;
- 一个名为
mongodb的服务,它会映射到运行MongoDB镜像的Pod的27017端口。
mongodb-deployment.yaml:
---
apiVersion: v1
kind: Namespace
metadata:
  name: mongodb

---
apiVersion: v1
kind: PersistentVolumeClaim
metadata:
  creationTimestamp: null
  name: mongodb-claim0
  namespace: mongodb
spec:
  accessModes:
  - ReadWriteOnce
  resources:
    requests:
      storage: 100Mi
status: {}

---
apiVersion: extensions/v1beta1
kind: Deployment
metadata:
  creationTimestamp: null
  name: mongodb
  namespace: mongodb
  labels:
    app: mongodb
spec:
  replicas: 1
  strategy:
    type: Recreate
  template:
    metadata:
      creationTimestamp: null
      labels:
        app: mongodb
    spec:
      containers:
      - image: mongo:3.4
        name: mongodb
        resources: {}
        volumeMounts:
        - mountPath: /data/db
          name: mongodb-claim0
      restartPolicy: Always
      volumes:
      - name: mongodb-claim0
        persistentVolumeClaim:
          claimName: mongodb-claim0
status: {}

---
apiVersion: v1
kind: Service
metadata:
  creationTimestamp: null
  name: mongodb
  namespace: mongodb
  labels:
    app: mongodb
spec:
  ports:
  - name: "mongodb"
    port: 27017
    targetPort: 27017
  selector:
    app: mongodb
status:
  loadBalancer: {}
将上面的配置保存为名为mongodb-deployment.yaml的文件,然后执行下面的命令:
kubectl create -f mongodb-deployment.yaml
通过下面的命令可以验证MongoDBPod是否正在运行:
$ kubectl get pods -n mongodb
NAME                      READY     STATUS    RESTARTS   AGE
mongodb-6b8f5585b-cprmw   1/1       Running   0          1d
# 6.2.安装Web控制台
要安装Web控制台,需要2个Docker镜像,一个前台一个后台。
创建命名空间
创建名为web-console的命名空间,控制台的前端和后端会建在这个命名空间里。
kubectl create namespace web-console
专有Docker存储库
如果要使用Docker Hub上的专用Docker存储库来获取前端和后端的Docker镜像,则需要添加一个具有访问存储库所需凭据的注册表项,为此,请使用以下命令:
kubectl create secret docker-registry registrykey --docker-server=https://index.docker.io/v1/ --docker-username=<username> --docker-password=<password> --docker-email=<email> -n web-console
它会被用于部署的配置中。
如果使用公共存储库,可以跳过此步骤并在下面提供的部署配置中注释掉imagePullSecrets项目。
安装Web控制台的前端和后端
下面的配置创建了前端和后端的部署,在该文件中,需要指定下面的参数:
- 后端部署段的
image参数,后端的Docker镜像; - 前端部署段的
image参数,前端的Docker镜像; server_sessionSecret,用户加密Cookie的密码,可以指定任意值。
web-console-deployment.yaml:
# creating deployment for the backend; specify a Docker Image
# in the 'image' field.
apiVersion: extensions/v1beta1
kind: Deployment
metadata:
  creationTimestamp: null
  labels:
    app: backend
  name: backend
  namespace: web-console
spec:
  replicas: 1
  strategy: {}
  template:
    metadata:
      creationTimestamp: null
      labels:
        app: backend
    spec:
      containers:
      - env:
        - name: mail_auth_pass
        - name: mail_auth_user
        - name: mail_from
        - name: mail_greeting
        - name: mail_service
        - name: mail_sign
        - name: mongodb_url
          value: mongodb://mongodb.mongodb.svc.cluster.local/console
        - name: server_host
          value: "0.0.0.0"
        - name: server_port
          value: "3000"
        - name: server_sessionSecret
          value: CHANGE_ME
        image:
        name: backend
        resources: {}
      restartPolicy: Always
      # remove this property if you use a public Docker repository
      imagePullSecrets:
        - name: registrykey
status: {}

---
apiVersion: v1
kind: Service
metadata:
  creationTimestamp: null
  name: backend
  namespace: web-console
  labels:
    app: backend
spec:
  ports:
  - name: "backend"
    port: 3000
    targetPort: 3000
  selector:
    app: backend
status:
  loadBalancer: {}

---
# creating deployment for the frontend; specify a Docker Image
# in the 'image' field.
apiVersion: extensions/v1beta1
kind: Deployment
metadata:
  creationTimestamp: null
  name: frontend
  namespace: web-console
spec:
  replicas: 1
  strategy: {}
  template:
    metadata:
      creationTimestamp: null
      labels:
        app: frontend
    spec:
      containers:
      - image:
        name: frontend
        ports:
        - containerPort: 80
        resources: {}
      restartPolicy: Always
      # remove this property if you use a public Docker repository
      imagePullSecrets:
        - name: registrykey
status: {}

---
apiVersion: v1
kind: Service
metadata:
  creationTimestamp: null
  name: frontend
  namespace: web-console
  labels:
    app: frontend
spec:
  ports:
  - name: "frontend"
    port: 80
    targetPort: 80
  selector:
    app: frontend
  type: LoadBalancer
status:
  loadBalancer: {}
将该配置保存为web-console-deployment.yaml文件,然后在终端中执行下面的命令:
kubectl create -f web-console-deployment.yaml
# 6.3.安装Web代理
安装Web代理之前,需要有一个正在运行的Ignite集群,并且这个Web代理要和集群安装在同一个命名空间中,关于Ignite的Kubernetes环境部署的详细信息,可以参见这个文档。
获得安全令牌
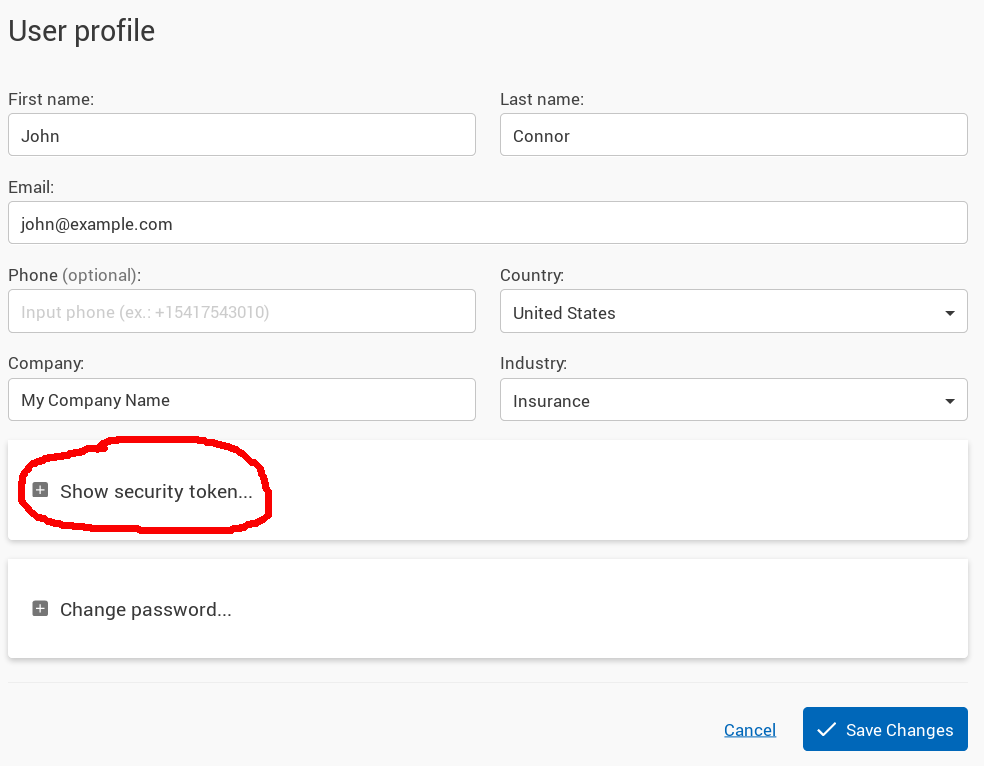
要安装Web代理,需要一个安全令牌来保护Web代理和Web控制台之间的通信,要获得这个令牌,可以登录Web控制台界面并打开自己的配置(点击右上角的用户名),然后点击Show security token...来显示这个令牌。
安装Web代理的Docker镜像
Web代理要和集群安装在同一个命名空间中,在下面的配置中,假定命名空间为ignite。
指定如下的参数:
NODE_URI:节点的URI,这个URI必须与Kubernetes集群中运行的集群节点相对应,Web代理会接入这个节点然后与集群进行通信;SERVER_URI:Kubernetes中安装的Web控制台的前端的URI,如果使用自定义配置,这个值需要修改(如果使用上面提供的示例而不更改命名空间和服务的名称,则提供的默认URL应起作用);TOKENS:指定从Web控制台中获得的安全令牌;NODE_LOGIN和NODE_PASSWORD:指定集群用户的用户名和密码,用户名和密码只有在Ignite集群开启认证的时候才是必须的;namespace:确保该命名空间与部署的集群的命名空间相对应;image:Web代理的Docker镜像。
web-agent-deployment.yaml:
apiVersion: apps/v1beta2
kind: Deployment
metadata:
  name: web-agent
  namespace: ignite
spec:
  selector:
    matchLabels:
      app: web-agent
  replicas: 1
  template:
    metadata:
      labels:
        app: web-agent
    spec:
      serviceAccountName: ignite-cluster
      containers:
      - name: web-agent
        image: apacheignite/web-agent:mytag3
        resources:
          limits:
            cpu: 500m
            memory: 500Mi
        env:
        - name: DRIVER_FOLDER
          value: "./jdbc-drivers"
        - name: NODE_URI
          value: "http://ignite-service.ignite.svc.cluster.local:8080"
        - name: SERVER_URI
          value: "http://frontend.web-console.svc.cluster.local"
        - name: TOKENS
          value: ""
        - name: NODE_LOGIN
          value: web-agent
        - name: NODE_PASSWORD
          value: password
将上述内容保存为web-agent-deployment.yaml文件然后执行下面的命令:
kubectl create -f web-agent-deployment.yaml
确认Web代理是否已经在运行:
$ kubectl get pods -n ignite
NAME                        READY     STATUS    RESTARTS   AGE
web-agent-5596bd78c-h4272   1/1       Running   0          1h