# 集群化
# 1.集群化
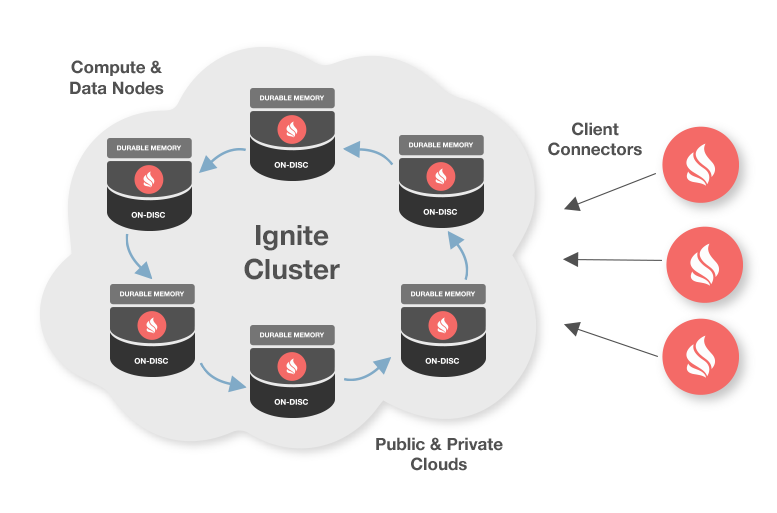
Ignite节点可以自动发现对方,这有助于集群的按需扩展,而不必重启整个集群。开发者还可以利用Ignite的混合云支持能力,在私有云和公有云(例如Amazon Web Services)之间建立连接,从而达到两全其美。
特性:
- 通过
IgniteDiscoverySpi实现的可插拔设计; - 动态拓扑管理;
- 跨LAN、WAN和AWS的自动发现;
- 按需直接部署;
- 支持虚拟集群和集群组。
# 1.1.IgniteCluster
集群的功能是通过ICluster接口提供的,可以像下面这样通过Ignite获得ICluster的实例:
IIgnite ignite = Ignition.Start();

ICluster cluster = ignite.GetCluster();
通过ICluster接口可以:
- 获得集群节点列表;
- 创建逻辑集群组。
# 1.2.ClusterNode
IClusterNode接口具有非常简洁的API,并且仅将节点作为拓扑中的逻辑网络端点进行处理。其持有全局唯一ID、节点指标、由用户设置的静态属性以及其他一些参数。
# 1.3.集群节点属性
在启动时所有集群节点都会自动将所有环境和系统属性注册为节点属性,另外开发者也可以注册自己的节点属性:
C#:
var cfg = new IgniteConfiguration
{
    UserAttributes = new Dictionary<string, object> { { "ROLE", "worker" } }
};
app.config:
<igniteConfiguration>
    <userAttributes>
        <pair key='ROLE' value='worker' />
    </userAttributes>
</igniteConfiguration>
Spring XML:
<bean class="org.apache.ignite.IgniteConfiguration">
    ...
    <property name="userAttributes">
        <map>
            <entry key="ROLE" value="worker"/>
        </map>
    </property>
    ...
</bean>
下面的示例会显示如何获得配置了worker属性的节点:
IClusterGroup workers = ignite.GetCluster().ForAttribute("ROLE", "worker");

ICollection<IClusterNode> nodes = workers.GetNodes();
提示
通过IClusterNode.GetAttributes()方法可以获得所有的节点属性。
# 1.4.集群节点指标
Ignite会自动收集所有集群节点的指标,指标在后台收集,并随着集群节点之间交换的每条心跳消息进行更新。
节点指标可通过IClusterMetrics获得,其包含了50多种指标(注意相同的指标也可用于集群组)。
这是获取本地节点一些指标的示例(包括平均CPU负载和已用堆空间):
// Local Ignite node.
IClusterNode localNode = cluster.GetLocalNode();

// Node metrics.
IClusterMetrics metrics = localNode.GetMetrics();

// Get some metric values.
double cpuLoad = metrics.CurrentCpuLoad;
long usedHeap = metrics.HeapMemoryUsed;
int numberOfCores = metrics.TotalCpus;
int activeJobs = metrics.CurrentActiveJobs;
# 1.5.本地集群节点
本地节点是表示当前Ignite.NET节点的IClusterNode实例:
下面是获取本地节点的一个示例:
IClusterNode localNode = ignite.GetCluster().GetLocalNode();
# 2.集群组
IClusterGroup用于表示集群节点的逻辑分组。
在Ignite.NET中,所有节点在设计上都是等价的,因此不必按特定顺序启动任何节点,也不必为其分配任何特定角色。不过Ignite允许开发者按需对集群节点进行逻辑分组。例如可能希望仅在远程节点上部署服务,或为某些工作节点分配worker角色用于作业的执行。
注意
注意ICluster接口也是一个集群组,其中包括集群中的所有节点。
可以将作业执行、服务部署、消息传递、事件和其他任务限制为仅在某些集群组中运行。例如下面是仅向远程节点(本地节点除外)广播作业的方法:
IIgnite ignite = Ignition.Start();

ICluster cluster = ignite.GetCluster();

// Get compute instance which will only execute
// over remote nodes, i.e. not this node.
ICompute compute = ignite.GetCompute(cluster.ForRemotes());

// Broadcast to all remote nodes and print the ID of the node
// on which this closure is executing.
compute.Broadcast(new MyComputeAction());
# 2.1.预定义集群组
可以基于任何谓词创建集群组,为了方便Ignite也附带了一些预定义的集群组。
以下是ClusterGroup接口上一些可用的集群组示例:
远程节点:
ICluster cluster = ignite.GetCluster();

// Cluster group with remote nodes, i.e. other than this node.
IClusterGroup remoteGroup = cluster.ForRemotes();
缓存节点:
ICluster cluster = ignite.GetCluster();

// All nodes on which cache with name "myCache" is deployed,
// either in client or server mode.
IClusterGroup cacheGroup = cluster.ForCacheNodes("myCache");

// All data nodes responsible for caching data for "myCache".
IClusterGroup dataGroup = cluster.ForDataNodes("myCache");

// All client nodes that access "myCache".
IClusterGroup clientGroup = cluster.ForClientNodes("myCache");
带有节点属性的节点:
ICluster cluster = ignite.GetCluster();

// All nodes with attribute "ROLE" equal to "worker".
IClusterGroup attrGroup = cluster.ForAttribute("ROLE", "worker");
某主机上的节点:
ICluster cluster = ignite.GetCluster();

// Pick a remote node.
IClusterNode remoteNode = cluster.ForRemotes().GetNode();

// All nodes on the same physical host as the remote node.
IClusterGroup sameHost = cluster.forHost(remoteNode);
最老的节点:
ICluster cluster = ignite.GetCluster();

// Dynamic cluster group representing the oldest cluster node.
// Will automatically shift to the next oldest, if the oldest
// node crashes.
IClusterGroup oldestNode = cluster.ForOldest();
本地节点:
ICluster cluster = ignite.GetCluster();

// Cluster group with only this (local) node in it.
IClusterGroup localGroup = cluster.ForLocal();

// Local node.
IClusterNode localNode = localGroup.GetNode();
# 2.2.自定义集群组
可以基于某些谓词定义动态集群组,这样的集群组将始终仅包括符合谓词的节点。
下面是CPU利用率低于50%的节点上的集群组示例,注意该组中的节点将根据其CPU负载随时间变化:
ICluster cluster = ignite.GetCluster();

// Nodes with less than 50% CPU load.
IClusterGroup readyNodes = _grid1.GetCluster().ForPredicate(node => node.GetMetrics().CurrentCpuLoad < 0.5);
# 2.3.从集群组获取节点
可以像下面这样获取各种集群组节点:
IClusterGroup remoteGroup = cluster.ForRemotes();

// All cluster nodes in the group.
ICollection<IClusterNode> grpNodes = remoteGroup.GetNodes();

// First node in the group (useful for groups with one node).
IClusterNode node = remoteGroup.GetNode();

// And if you know a node ID, get node by ID.
Guid myID = ...;

node = remoteGroup.GetNode(myId);
# 2.4.集群组指标
Ignite会自动收集有关所有集群节点的指标,更好的是它会自动聚合集群组中所有节点上的指标,并在组中提供适当的平均值,最小值和最大值。
通过IClusterMetrics接口可以拿到50多种不同的集群组指标(注意相同的指标也可用于单个集群节点)。
这是获取所有远程节点上的部分指标的示例(包括平均CPU负载和已用堆空间):
// Cluster group with remote nodes, i.e. other than this node.
IClusterGroup remoteGroup = ignite.GetCluster().ForRemotes();

// Cluster group metrics.
IClusterMetrics metrics = remoteGroup.GetMetrics();

// Get some metric values.
double cpuLoad = metrics.CurrentCpuLoad;
long usedHeap = metrics.HeapMemoryUsed;
int numberOfCores = metrics.TotalCpus;
int activeJobs = metrics.CurrentActiveJobs;
# 3.领导者选举
在分布式环境中,有时需要保证始终选择相同的节点,而不管集群拓扑如何变化,这样的节点通常称为领导者。
在许多系统中,选举集群领导者通常与数据的一致性有关,并通过收集集群节点的选票来处理。而在Ignite中数据一致性是由数据网格的关联函数(例如约会哈希)处理的,因此传统意义上通过选择领导者来确保数据网格之外的数据一致性是不需要的。
不过可能还是希望针对某些任务能有一个协调器节点。为此Ignite可以自动始终选择集群中最老或最新的节点。
使用服务网格
注意,对于大多数领导者或类似单例的场景,建议使用服务网格功能,因为它可以自动部署各种集群单例服务,并且通常更易于使用。
# 3.1.最老的节点
最老的节点有一个属性,无论何时添加新节点,它都保持不变。最老的节点变更的唯一时点是它离开集群或故障时。
下面是如何获取仅包含最老节点的集群组的示例:
ICluster cluster = ignite.GetCluster();

// Dynamic cluster group representing the oldest cluster node.
// Will automatically shift to the next oldest, if the oldest
// node crashes.
IClusterGroup oldestNode = cluster.ForOldest();
# 3.2.最新的节点
最新的节点与最老的节点不同,每当新节点加入集群时都会不断变化。不过有时它仍然很方便,特别是如果仅需要在新加入的节点上执行某些任务时,尤其如此。
下面是如何获取仅包含最新节点的集群组的示例:
ICluster cluster = ignite.GetCluster();

// Dynamic cluster group representing the youngest cluster node.
// Will automatically shift to the previous youngest, if the youngest
// node crashes.
IClusterGroup youngestNode = cluster.ForYoungest();
提示
获取集群组后,就可以将其用于执行任务、部署服务、发送消息等等。
# 4.集群配置
在Ignite中,节点可以通过DiscoverySpi相互发现,其默认实现是使用TCP/IP的TcpDiscoverySpi,Ignite中还支持基于组播和静态IP机制的节点发现模式。
# 4.1.基于组播的发现
TcpDiscoveryMulticastIpFinder使用组播来发现网格中的其他节点,并且是默认的IP探测器。除非打算修改默认设置,否则不必指定它。下面是配置此探测器的示例:
C#:
var cfg = new IgniteConfiguration
{
    DiscoverySpi = new TcpDiscoverySpi
    {
        IpFinder = new TcpDiscoveryMulticastIpFinder
        {
            MulticastGroup = "228.10.10.157"
        }
    }
};
app.config:
<igniteConfiguration>
    <discoverySpi type='TcpDiscoverySpi'>
        <ipFinder type='TcpDiscoveryMulticastIpFinder' multicastGroup='228.10.10.157' />
    </discoverySpi>
</igniteConfiguration>
Spring XML:
<bean class="org.apache.ignite.configuration.IgniteConfiguration">
  ...
  <property name="discoverySpi">
    <bean class="org.apache.ignite.spi.discovery.tcp.TcpDiscoverySpi">
      <property name="ipFinder">
        <bean class="org.apache.ignite.spi.discovery.tcp.ipfinder.multicast.TcpDiscoveryMulticastIpFinder">
          <property name="multicastGroup" value="228.10.10.157"/>
        </bean>
      </property>
    </bean>
  </property>
</bean>
# 4.2.基于静态IP的发现
对于禁用了组播的情况,应该使用TcpDiscoveryStaticIpFinder(Java中的TcpDiscoveryVmIpFinder),它需要事先配置好一个IP地址列表。
只需要提供至少一个远程节点的IP地址,但是通常建议提供2-3个在将来可能会启动的节点的地址。一旦建立了到任意IP地址的连接,Ignite就会自动发现所有其他的节点。
警告
TcpDiscoveryStaticIpFinder默认在非共享模式下使用。如果打算启动服务端节点,则在此模式下,IP地址列表也应包含本地节点的地址,这样就不需要等待其他节点的加入,而是成为第一个节点并正常运行。
下面是配置此探测器的示例:
C#:
var cfg = new IgniteConfiguration
{
    DiscoverySpi = new TcpDiscoverySpi
    {
        IpFinder = new TcpDiscoveryStaticIpFinder
        {
            Endpoints = {"1.2.3.4", "1.2.3.5:47500..47509" }
        }
    }
};
app.config:
<igniteConfiguration>
    <discoverySpi type='TcpDiscoverySpi'>
        <ipFinder type='TcpDiscoveryStaticIpFinder'>
            <endpoints>
                <string>1.2.3.4</string>
                <string>1.2.3.5:47500..47509</string>
            </endpoints>
        </ipFinder>
    </discoverySpi>
</igniteConfiguration>
Spring XML:
<bean class="org.apache.ignite.configuration.IgniteConfiguration">
  ...
  <property name="discoverySpi">
    <bean class="org.apache.ignite.spi.discovery.tcp.TcpDiscoverySpi">
      <property name="ipFinder">
        <bean class="org.apache.ignite.spi.discovery.tcp.ipfinder.vm.TcpDiscoveryVmIpFinder">
          <property name="addresses">
            <list>
              <value>1.2.3.4</value>
              <value>1.2.3.5:47500..47509</value>
            </list>
          </property>
        </bean>
      </property>
    </bean>
  </property>
</bean>
# 4.3.基于组播和静态IP的发现
可以同时使用基于组播和静态IP的发现。这时除了通过组播接收的地址(如果有)之外,TcpDiscoveryMulticastIpFinder还可以与预配置的静态IP地址列表一起使用,就像上述基于静态IP的发现一样。下面是配置示例:
C#:
var cfg = new IgniteConfiguration
{
    DiscoverySpi = new TcpDiscoverySpi
    {
        IpFinder = new TcpDiscoveryMulticastIpFinder
        {
            MulticastGroup = "228.10.10.157",
            Endpoints = {"1.2.3.4", "1.2.3.5:47500..47509" }
        }
    }
};
app.config:
<igniteConfiguration>
    <discoverySpi type='TcpDiscoverySpi'>
        <ipFinder type='TcpDiscoveryMulticastIpFinder' multicastGroup='228.10.10.157'>
            <endpoints>
                <string>1.2.3.4</string>
                <string>1.2.3.5:47500..47509</string>
            </endpoints>
        </ipFinder>
    </discoverySpi>
</igniteConfiguration>
Spring XML:
<bean class="org.apache.ignite.configuration.IgniteConfiguration">
  ...
  <property name="discoverySpi">
    <bean class="org.apache.ignite.spi.discovery.tcp.TcpDiscoverySpi">
      <property name="ipFinder">
        <bean class="org.apache.ignite.spi.discovery.tcp.ipfinder.multicast.TcpDiscoveryMulticastIpFinder">
          <property name="multicastGroup" value="228.10.10.157"/>
          <property name="addresses">
            <list>
              <value>1.2.3.4</value>
              <value>1.2.3.5:47500..47509</value>
            </list>
          </property>
        </bean>
      </property>
    </bean>
  </property>
</bean>
# 4.4.在同一个机器组中隔离Ignite集群
出于测试目的或其他原因,有时可能需要在同一台主机上启动两个隔离的Ignite集群。
对于TcpDiscoverySpi和TcpCommunicationSpi,如果不同集群的节点使用非交叉的本地端口范围,这个功能是可以实现的。
假设需要在一台主机上启动两个隔离的集群用于测试,那么第一个集群中的节点,应使用以下TcpDiscoverySpi和TcpCommunicationSpi配置:
C#:
var cfg = new IgniteConfiguration
{
    // Explicitly configure TCP discovery SPI to provide list of initial nodes
    // from the first cluster.
    DiscoverySpi = new TcpDiscoverySpi
    {
        // Initial local port to listen to.
        LocalPort = 48500,
        // Changing local port range. This is an optional action.
        LocalPortRange = 20,
        IpFinder = new TcpDiscoveryStaticIpFinder
        {
            // Addresses and port range of the nodes from the first cluster.
            // 127.0.0.1 can be replaced with actual IP addresses or host names.
            // The port range is optional.
            Endpoints = new[] {"127.0.0.1:48500..48520"}
        }
    },
    // Explicitly configure TCP communication SPI changing
    // local port number for the nodes from the first cluster.
    CommunicationSpi = new TcpCommunicationSpi
    {
        LocalPort = 48100
    }
};
app.config:
<igniteConfiguration>
    <!--
        Explicitly configure TCP discovery SPI to provide list of initial
        nodes from the second cluster.
    -->
    <discoverySpi type='TcpDiscoverySpi' localPort='48500' localPortRange='20'>
        <ipFinder type='TcpDiscoveryMulticastIpFinder'>
            <endpoints>
                <!--
                    Addresses and port range of the nodes from the second cluster.
                    127.0.0.1 can be replaced with actual IP addresses or host names. Port range is optional.
                -->
                <string>127.0.0.1:48500..48520</string>
            </endpoints>
        </ipFinder>
    </discoverySpi>

    <!--
        Explicitly configure TCP communication SPI changing local port number
        for the nodes from the second cluster.
    -->
    <communicationSpi type='TcpCommunicationSpi' localPort='48100' />
</igniteConfiguration>
Spring XML:
<bean class="org.apache.ignite.configuration.IgniteConfiguration">
  	...
    <!--
 				Explicitly configure TCP discovery SPI to provide list of
				initial nodes from the first cluster.
 	  -->
    <property name="discoverySpi">
        <bean class="org.apache.ignite.spi.discovery.tcp.TcpDiscoverySpi">
            <!-- Initial local port to listen to. -->
            <property name="localPort" value="48500"/>

            <!-- Changing local port range. This is an optional action. -->
            <property name="localPortRange" value="20"/>

            <!-- Setting up IP finder for this cluster -->
            <property name="ipFinder">
                <bean class="org.apache.ignite.spi.discovery.tcp.ipfinder.vm.TcpDiscoveryVmIpFinder">
                    <property name="addresses">
                        <list>
                            <!--
                                Addresses and port range of the nodes from the first
 																cluster.
                                127.0.0.1 can be replaced with actual IP addresses or
 																host names. Port range is optional.
                            -->
                            <value>127.0.0.1:48500..48520</value>
                        </list>
                    </property>
                </bean>
            </property>
        </bean>
    </property>

    <!--
        Explicitly configure TCP communication SPI changing local
 				port number for the nodes from the first cluster.
    -->
    <property name="communicationSpi">
        <bean class="org.apache.ignite.spi.communication.tcp.TcpCommunicationSpi">
            <property name="localPort" value="48100"/>
        </bean>
    </property>
</bean>
而第二个集群中的节点,配置如下:
C#:
var cfg = new IgniteConfiguration
{
    // Explicitly configure TCP discovery SPI to provide list of initial nodes
    // from the first cluster.
    DiscoverySpi = new TcpDiscoverySpi
    {
        // Initial local port to listen to.
        LocalPort = 49500,
        // Changing local port range. This is an optional action.
        LocalPortRange = 20,
        IpFinder = new TcpDiscoveryStaticIpFinder
        {
            // Addresses and port range of the nodes from the first cluster.
            // 127.0.0.1 can be replaced with actual IP addresses or host names.
            // The port range is optional.
            Endpoints = {"127.0.0.1:49500..49520"}
        }
    },
    // Explicitly configure TCP communication SPI changing
    // local port number for the nodes from the first cluster.
    CommunicationSpi = new TcpCommunicationSpi
    {
        LocalPort = 49100
    }
};
app.config:
<igniteConfiguration>
    <!--
        Explicitly configure TCP discovery SPI to provide list of initial
        nodes from the second cluster.
    -->
    <discoverySpi type='TcpDiscoverySpi' localPort='49500' localPortRange='20'>
        <ipFinder type='TcpDiscoveryMulticastIpFinder'>
            <endpoints>
                <!--
                    Addresses and port range of the nodes from the second cluster.
                    127.0.0.1 can be replaced with actual IP addresses or host names. Port range is optional.
                -->
                <string>127.0.0.1:49500..49520</string>
            </endpoints>
        </ipFinder>
    </discoverySpi>

    <!--
        Explicitly configure TCP communication SPI changing local port number
        for the nodes from the second cluster.
    -->
    <communicationSpi type='TcpCommunicationSpi' localPort='49100' />
</igniteConfiguration>
Spring XML:
<bean id="ignite.cfg" class="org.apache.ignite.configuration.IgniteConfiguration">
    <!--
        Explicitly configure TCP discovery SPI to provide list of initial
         nodes from the second cluster.
    -->
    <property name="discoverySpi">
        <bean class="org.apache.ignite.spi.discovery.tcp.TcpDiscoverySpi">
            <!-- Initial local port to listen to. -->
            <property name="localPort" value="49500"/>

            <!-- Changing local port range. This is an optional action. -->
            <property name="localPortRange" value="20"/>

            <!-- Setting up IP finder for this cluster -->
            <property name="ipFinder">
                <bean class="org.apache.ignite.spi.discovery.tcp.ipfinder.vm.TcpDiscoveryVmIpFinder">
                    <property name="addresses">
                        <list>
                            <!--
                                Addresses and port range of the nodes from the second
 																cluster.
                                127.0.0.1 can be replaced with actual IP addresses or
 																host names. Port range is optional.
                            -->
                            <value>127.0.0.1:49500..49520</value>
                        </list>
                    </property>
                </bean>
            </property>
        </bean>
    </property>

    <!--
        Explicitly configure TCP communication SPI changing local port number
        for the nodes from the second cluster.
    -->
    <property name="communicationSpi">
        <bean class="org.apache.ignite.spi.communication.tcp.TcpCommunicationSpi">
            <property name="localPort" value="49100"/>
        </bean>
    </property>
</bean>
从配置中可以看到,它们之间的差别很小,仅SPI和IP探测器的端口号有所不同。
提示
如果希望来自不同集群的节点能使用组播协议互相发现,则在上面的每个配置中可以将TcpDiscoveryStaticIpFinder替换为TcpDiscoveryMulticastIpFinder,并为每个集群设置唯一的TcpDiscoveryMulticastIpFinder.MulticastGroups。
# 4.5.故障检测超时
故障检测超时用于确定节点在认为无法与其他节点连接之前应等待多长时间,这是根据集群的网络和硬件条件调整发现SPI的故障检测功能的最简单方法。
注意
超时自动控制诸如TcpDiscoverySpi套接字超时、消息确认超时等配置参数,如果显式配置了这些参数中的任何一个,则故障超时配置将被忽略。
故障检测超时通过IgniteConfiguration.FailureDetectionTimeout属性进行配置,默认值是10秒,该值可以使发现SPI在大多数硬件和虚拟环境上都能可靠地工作,但这使故障检测时间变得很长。不过对于稳定的低延迟网络,该参数可以设置为~200毫秒,以便更快地检测故障并对故障做出反应。
# 5.网络配置
CommunicationSpi提供了基本的管道用于发送和接收网格消息,以及所有的分布式网格操作,例如任务执行、监控数据交换、分布式事件查询等。Ignite提供了TcpCommunicationSpi作为CommunicationSpi的默认实现,其使用TCP/IP与其他节点进行通信。
启动时此SPI会尝试监听由TcpCommunicationSpi.LocalPort指定的本地端口,如果本地端口被占用,那么SPI将自动增加端口号,直到成功绑定为止,SPI在失败之前将尝试的最大端口数由TcpCommunicationSpi.LocalPortRange参数控制。
本地端口范围
当在同一台主机甚至同一台VM上启动多个节点时,端口范围非常方便。这时无需修改任何配置即可启动所有节点。
示例
C#:
var cfg = new IgniteConfiguration
{
    CommunicationSpi = new TcpCommunicationSpi
    {
        LocalPort = 4321   // Override local port.
    }
};
app.config:
<igniteConfiguration>
  	<!-- Override local port. -->
    <communicationSpi type='TcpCommunicationSpi' localPort='4321' />
</igniteConfiguration>
Spring XML:
<bean class="org.apache.ignite.configuration.IgniteConfiguration">
  ...
  <property name="communicationSpi">
    <bean class="org.apache.ignite.spi.communication.tcp.TcpCommunicationSpi">
      <!-- Override local port. -->
      <property name="localPort" value="4321"/>
    </bean>
  </property>
  ...
</bean>
# 6.SSL和TLS
Ignite.NET支持在所有节点间使用SSL套接字通信,具体可以参见Ignite的文档SSL和TLS。
# 7.远程程序集加载
# 7.1.概述
许多Ignite API都涉及远程代码执行,例如将计算任务和函数序列化,然后发送到远程节点并执行。但是远程节点必须加载具有这些功能的.NET程序集(dll文件),以便实例化和反序列化任务实例。
在Ignite的2.1版之前,必须手动加载程序集(使用Apache.Ignite.exe的-assembly开关或其他方式)。从2.1版开始引入了自动远程程序集加载,由IgniteConfiguration.PeerAssemblyLoadingMode控制。其默认值为Disabled,这意味着和之前的行为一致。在集群中的所有节点上,该属性值必须全部相同。还有另一种可用的模式是CurrentAppDomain。
# 7.2.CurrentAppDomain模式
开启PeerAssemblyLoadingMode.CurrentAppDomain可以实现集群中其他节点的自动按需程序集请求,将程序集加载到运行Ignite节点的AppDomain中。
考虑以下代码:
// Print Hello World on all cluster nodes.
ignite.GetCompute().Broadcast(new HelloAction());

class HelloAction : IComputeAction
{
  public void Invoke()
  {
    Console.WriteLine("Hello World!");
  }
}
- Ignite序列化
HelloAction实例并发送到集群中的每个节点; - 远程节点尝试反序列化
HelloAction,如果当前已加载或引用的程序集中没有此类,则将请求发送到Broadcast被调用的节点,然后发送到其他节点(如有必要); - 程序集文件从其他节点作为字节数组发送,并通过
Assembly.Load(byte[])方法加载。
版本控制
程序集限定类型名(包括程序集版本)用于解析类型。
如果集群处于运行态,修改HelloAction,让其输出一些内容,再修改AssemblyVersion,重新编译并运行代码,将部署并执行新版本的程序集。
但是如果不修改AssemblyVersion,则Ignite将使用以前加载的现有程序集,因为类型名没有变化。
不同版本的程序集可以共存,老节点可以继续运行旧代码,而新节点可以使用同一类的较新版本执行计算。
AssemblyVersion属性可以包含星号(*),以在构建时可以自动增量处理:[assembly: AssemblyVersion("1.0.*")]。这样就可以保持集群运行,重复修改和运行计算,并且每次都将部署新的程序集版本。
依赖
依赖程序集也会自动加载(例如ComputeAction从其他程序集调用某些代码时),因此使用很重的框架和库时,要注意单个计算调用可能导致大量程序集的网络传输。
卸载
.NET不允许卸载程序集,只能是AppDomain作为整体卸载所有的程序集。当前可用的CurrentAppDomain模式使用现有的AppDomain,这意味着在当前AppDomain存在时,所有对等部署的程序集将保持加载状态,这可能会导致内存使用增加。
# 7.3.示例
二进制包中有PeerAssemblyLoadingExample,具体可以参见源代码。
下面是使用NuGet测试程序集加载的方法:
- 在Visual Studio中创建一个新的控制台应用;
- 安装Ignite.NET NuGet软件包
Install-Package Apache.Ignite; - 打开
packages\Apache.Ignite.2.1\lib\net40文件夹; - 向
<igniteConfiguration>元素添加peerAssemblyLoadingMode='CurrentAppDomain'属性; - 运行
Apache.Ignite.exe(一次或多次),保持进程运行; - 将
AssemblyInfo.cs中的AssemblyVersion值改为1.0.*; - 在Visual Studio中修改
Program.cs,如下所示:
Program.cs:
using System;
using Apache.Ignite.Core;
using Apache.Ignite.Core.Compute;
using Apache.Ignite.Core.Deployment;

namespace ConsoleApp
{
    class Program
    {
        static void Main(string[] args)
        {
            var cfg = new IgniteConfiguration
            {
                PeerAssemblyLoadingMode = PeerAssemblyLoadingMode.CurrentAppDomain
            };

            using (var ignite = Ignition.Start(cfg))
            {
                ignite.GetCompute().Broadcast(new HelloAction());
            }
        }

        class HelloAction : IComputeAction
        {
            public void Invoke()
            {
                Console.WriteLine("Hello, World!");
            }
        }
    }
}
Apache.Ignite.exe.config:
<igniteConfiguration peerAssemblyLoadingMode='CurrentAppDomain' />
AssemblyInfo.cs:
...
[assembly: AssemblyVersion("1.0.*")]
...
- 运行该项目并观察"Hello,World!"在所有
Apache.Ignite.exe窗口的控制台输出; - 将"Hello,World!"改为其他的值,然后再次运行该程序,观察每个节点的输出有何不同。