# 集群化
# 1.集群化
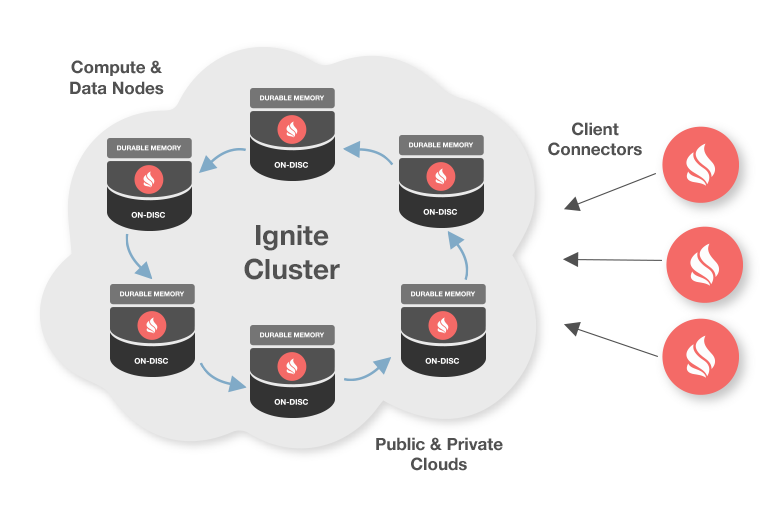
Ignite具有非常先进的集群能力,包括逻辑集群组和自动发现。
Ignite节点之间会自动发现对方,这有助于必要时扩展集群,而不需要重启整个集群。开发者可以利用Ignite的混合云支持,允许公有云(比如AWS)和私有云之间建立连接,向它们提供两者的好处。
# 2.集群API
# 2.1.IgniteCluster
集群的功能是通过IgniteCluster接口提供的,可以像下面这样从Ignite中获得一个IgniteCluster的实例:
Ignite ignite = Ignition.ignite();
IgniteCluster cluster = ignite.cluster();
通过IgniteCluster接口可以:
- 启动和停止一个远程集群节点;
- 获取集群成员的列表;
- 创建逻辑
集群组;
# 2.2.ClusterNode
ClusterNode接口具有非常简洁的API,它只处理集群中的节点,把它视为拓扑中的逻辑端点,它有一个唯一的ID,节点的元数据信息,静态属性集以及一些其它的参数。
# 2.3.集群节点属性
所有的集群节点在启动时都会自动地注册环境和系统的参数,把它们作为节点的属性,也可以通过配置添加自定义的节点属性。
<bean class="org.apache.ignite.IgniteConfiguration">
    ...
    <property name="userAttributes">
        <map>
            <entry key="ROLE" value="worker"/>
        </map>
    </property>
    ...
</bean>
下面的代码显示了如何获得设置了“worker”属性的节点:
ClusterGroup workers = ignite.cluster().forAttribute("ROLE", "worker");
Collection<ClusterNode> nodes = workers.nodes();
注意
所有的节点属性都是通过ClusterNode.attribute("propertyName")方法获得的。
# 2.4.集群节点指标数据
Ignite自动收集集群中所有节点的指标数据,指标数据是在后台收集的并且被集群节点之间的每一次心跳消息交换所更新。
节点的指标数据是通过ClusterMetrics接口体现的,它包括至少50种指标(注意,同样的指标也可以用于集群组)。
下面是一个获取一些指标数据的示例,包括本地节点的平均CPU负载,已用堆大小:
// Local Ignite node.
ClusterNode localNode = cluster.localNode();

// Node metrics.
ClusterMetrics metrics = localNode.metrics();

// Get some metric values.
double cpuLoad = metrics.getCurrentCpuLoad();
long usedHeap = metrics.getHeapMemoryUsed();
int numberOfCores = metrics.getTotalCpus();
int activeJobs = metrics.getCurrentActiveJobs();
# 2.5.本地集群节点
本地集群节点是ClusterNode的一个实例,表示当前的Ignite节点。
下面的例子显示如何获得本地节点:
ClusterNode localNode = ignite.cluster().localNode();
# 3.集群组
ClusterGroup表示集群内节点的一个逻辑组。
从设计上讲,所有集群节点都是平等的,所以没有必要以一个特定的顺序启动任何节点,或者给它们赋予特定的规则。不过Ignite可以因为一些应用的特殊需求而创建集群节点的逻辑组,比如,可能希望只在远程节点上部署一个服务,或者给部分worker节点赋予一个叫做worker的规则来做作业的执行。
注意
注意IgniteCluster接口也是一个集群组,只不过包括集群内的所有节点。
可以限制作业执行、服务部署、消息、事件以及其它任务只在部分集群组内执行,比如,下面这个例子只把作业广播到远程节点(除了本地节点):
Java8:
final Ignite ignite = Ignition.ignite();

IgniteCluster cluster = ignite.cluster();

// Get compute instance which will only execute
// over remote nodes, i.e. not this node.
IgniteCompute compute = ignite.compute(cluster.forRemotes());

// Broadcast to all remote nodes and print the ID of the node
// on which this closure is executing.
compute.broadcast(() -> System.out.println("Hello Node: " + ignite.cluster().localNode().id());
Java7:
final Ignite ignite = Ignition.ignite();

IgniteCluster cluster = ignite.cluster();

// Get compute instance which will only execute
// over remote nodes, i.e. not this node.
IgniteCompute compute = ignite.compute(cluster.forRemotes());

// Broadcast closure only to remote nodes.
compute.broadcast(new IgniteRunnable() {
    @Override public void run() {
        // Print ID of the node on which this runnable is executing.
        System.out.println(">>> Hello Node: " + ignite.cluster().localNode().id());
    }
});
# 3.1.预定义集群组
可以基于任何谓词创建集群组,为了方便Ignite也提供了一些预定义的集群组。
下面的示例显示了ClusterGroup接口中定义的部分集群组:
远程节点
IgniteCluster cluster = ignite.cluster();

// Cluster group with remote nodes, i.e. other than this node.
ClusterGroup remoteGroup = cluster.forRemotes();
缓存节点
IgniteCluster cluster = ignite.cluster();

// All nodes on which cache with name "myCache" is deployed,
// either in client or server mode.
ClusterGroup cacheGroup = cluster.forCache("myCache");

// All data nodes responsible for caching data for "myCache".
ClusterGroup dataGroup = cluster.forDataNodes("myCache");

// All client nodes that access "myCache".
ClusterGroup clientGroup = cluster.forClientNodes("myCache");
有属性的节点
IgniteCluster cluster = ignite.cluster();

// All nodes with attribute "ROLE" equal to "worker".
ClusterGroup attrGroup = cluster.forAttribute("ROLE", "worker");
随机节点
IgniteCluster cluster = ignite.cluster();

// Cluster group containing one random node.
ClusterGroup randomGroup = cluster.forRandom();

// First (and only) node in the random group.
ClusterNode randomNode = randomGroup.node();
主机节点
IgniteCluster cluster = ignite.cluster();

// Pick random node.
ClusterGroup randomNode = cluster.forRandom();

// All nodes on the same physical host as the random node.
ClusterGroup cacheNodes = cluster.forHost(randomNode);
最老的节点
IgniteCluster cluster = ignite.cluster();

// Dynamic cluster group representing the oldest cluster node.
// Will automatically shift to the next oldest, if the oldest
// node crashes.
ClusterGroup oldestNode = cluster.forOldest();
本地节点
IgniteCluster cluster = ignite.cluster();

// Cluster group with only this (local) node in it.
ClusterGroup localGroup = cluster.forLocal();

// Local node.
ClusterNode localNode = localGroup.node();
客户端和服务端
IgniteCluster cluster = ignite.cluster();

// All client nodes.
ClusterGroup clientGroup = cluster.forClients();

// All server nodes.
ClusterGroup serverGroup = cluster.forServers();
# 3.2.带节点属性的集群组
Ignite的唯一特点是所有节点都是平等的。没有master节点或者server节点,也没有worker节点或者client节点,按照Ignite的观点所有节点都是平等的。但是,可以将节点配置成主节点,工作节点,或者客户端以及数据节点。
所有集群节点启动时都会自动将所有的环境和系统属性注册为节点的属性,但是也可以通过配置自定义节点属性。
XML:
<bean class="org.apache.ignite.IgniteConfiguration">
    ...
    <property name="userAttributes">
        <map>
            <entry key="ROLE" value="worker"/>
        </map>
    </property>
    ...
</bean>
Java:
IgniteConfiguration cfg = new IgniteConfiguration();

Map<String, String> attrs = Collections.singletonMap("ROLE", "worker");

cfg.setUserAttributes(attrs);

// Start Ignite node.
Ignite ignite = Ignition.start(cfg);
注意
启动时,所有的环境变量和系统属性都会自动地注册为节点属性。
节点属性是通过ClusterNode.attribute("propertyName")属性获得的。
下面的例子显示了如何获得赋予了‘worker’属性值的节点:
IgniteCluster cluster = ignite.cluster();

ClusterGroup workerGroup = cluster.forAttribute("ROLE", "worker");

Collection<GridNode> workerNodes = workerGroup.nodes();
# 3.3.自定义集群组
可以基于一些谓词定义动态集群组,这个集群组只会包含符合该谓词的节点。
下面是一个例子,一个集群组只会包括CPU利用率小于50%的节点,注意这个组里面的节点会随着CPU负载的变化而改变。
IgniteCluster cluster = ignite.cluster();

// Nodes with less than 50% CPU load.
ClusterGroup readyNodes = cluster.forPredicate((node) -> node.metrics().getCurrentCpuLoad() < 0.5);
# 3.4.集群组组合
可以通过彼此之间的嵌套来组合集群组,比如,下面的代码片段显示了如何通过组合最老组和远程组来获得最老的远程节点:
// Group containing oldest node out of remote nodes.
ClusterGroup oldestGroup = cluster.forRemotes().forOldest();

ClusterNode oldestNode = oldestGroup.node();
# 3.5.从集群组中获得节点
可以像下面这样获得各种集群组的节点:
ClusterGroup remoteGroup = cluster.forRemotes();

// All cluster nodes in the group.
Collection<ClusterNode> grpNodes = remoteGroup.nodes();

// First node in the group (useful for groups with one node).
ClusterNode node = remoteGroup.node();

// And if you know a node ID, get node by ID.
UUID myID = ...;

node = remoteGroup.node(myId);
# 3.6.集群组指标数据
Ignite自动收集所有集群节点的指标数据,很酷的事是集群组会自动地收集组内所有节点的指标数据,然后提供组内正确的平均值,最小值,最大值等信息。
集群组指标数据是通过ClusterMetrics接口体现的,它包括了超过50个指标(注意,同样的指标单独的集群节点也有)。
下面的例子是获取一些指标数据,包括所有远程节点的平均CPU利用率以及可用堆大小:
// Cluster group with remote nodes, i.e. other than this node.
ClusterGroup remoteGroup = ignite.cluster().forRemotes();

// Cluster group metrics.
ClusterMetrics metrics = remoteGroup.metrics();

// Get some metric values.
double cpuLoad = metrics.getCurrentCpuLoad();
long usedHeap = metrics.getHeapMemoryUsed();
int numberOfCores = metrics.getTotalCpus();
int activeJobs = metrics.getCurrentActiveJobs();
# 4.领导者选举
# 4.1.概述
当工作在分布式环境中时,有时需要确保有这么一个节点,不管拓扑是否发生变化,这个节点通常被叫做leader(领导者)。
很多系统选举领导者通常要处理数据一致性,然后通常是通过收集集群成员的选票处理的。而在Ignite中,数据一致性是通过数据网格的类似功能处理的(约会哈希或者HRW哈希),选择领导者在传统意义上的数据一致性,在数据网格以外就不是真的需要了。
不过可能还是希望有一个协调员节点来处理某些任务,为了这个,Ignite允许在集群中自动地选择最老的或者最新的节点。
使用服务网格
注意对于大多数领导者或者类单例用例中,建议使用服务网格功能,它可以自动地部署各个集群单例服务,而且更易于使用。
# 4.2.最老的节点
每当新节点加入时,最老的节点都有一个保持不变的属性,集群中的最老节点唯一发生变化的时间点就是它从集群中退出或者该节点故障。
下面的例子显示了如何选择一个集群组,它只包含了最老的节点。
IgniteCluster cluster = ignite.cluster();

// Dynamic cluster group representing the oldest cluster node.
// Will automatically shift to the next oldest, if the oldest
// node crashes.
ClusterGroup oldestNode = cluster.forOldest();
# 4.3.最新的节点
最新的节点,与最老的节点不同,每当新节点加入集群时都会不断发生变化,不过有时它也会变得很灵活,尤其是如果希望只在最新的节点上执行一些任务时。
下面的例子显示了如何选择一个集群组,它只包含了最新的节点。
IgniteCluster cluster = ignite.cluster();

// Dynamic cluster group representing the youngest cluster node.
// Will automatically shift to the next youngest, if the youngest
// node crashes.
ClusterGroup youngestNode = cluster.forYoungest();
注意
一旦获得了集群组,就可以用它执行任务、部署服务、发送消息等。
# 5.集群发现
Ignite的发现机制,根据不同的使用场景,有两种实现:
- TCP/IP发现:面向百级集群节点设计和优化;
- ZooKeeper发现:允许将Ignite集群节点数扩展至百级甚至千级,仍然保证扩展性和性能。
# 5.1.TCP/IP发现
# 5.1.1.概述
Ignite中,通过DiscoverySpi节点可以彼此发现对方,Ignite提供了TcpDiscoverySpi作为DiscoverySpi的默认实现,它使用TCP/IP来作为节点发现的实现,可以配置成基于组播的或者基于静态IP的。
# 5.1.2.组播IP探测器
TcpDiscoveryMulticastIpFinder使用组播来发现网格内的每个节点。它也是默认的IP探测器。除非打算覆盖默认的设置否则不需要指定它。
下面的例子显示了如何通过Spring XML配置文件或者通过Java代码编程式地进行配置:
XML:
<bean class="org.apache.ignite.configuration.IgniteConfiguration">
  ...
  <property name="discoverySpi">
    <bean class="org.apache.ignite.spi.discovery.tcp.TcpDiscoverySpi">
      <property name="ipFinder">
        <bean class="org.apache.ignite.spi.discovery.tcp.ipfinder.multicast.TcpDiscoveryMulticastIpFinder">
          <property name="multicastGroup" value="228.10.10.157"/>
        </bean>
      </property>
    </bean>
  </property>
</bean>
Java:
TcpDiscoverySpi spi = new TcpDiscoverySpi();

TcpDiscoveryMulticastIpFinder ipFinder = new TcpDiscoveryMulticastIpFinder();

ipFinder.setMulticastGroup("228.10.10.157");

spi.setIpFinder(ipFinder);

IgniteConfiguration cfg = new IgniteConfiguration();

// Override default discovery SPI.
cfg.setDiscoverySpi(spi);

// Start Ignite node.
Ignition.start(cfg);
# 5.1.3.静态IP探测器
对于组播被禁用的情况,TcpDiscoveryVmIpFinder会使用预配置的IP地址列表。
唯一需要提供的就是至少一个远程节点的IP地址,但是为了保证冗余一个比较好的做法是在未来的某些时间点提供2-3个计划启动的网格节点的IP地址。只要建立了与任何一个已提供的IP地址的连接,Ignite就会自动地发现其它的所有节点。
注意
除了在配置中指定地址,还可以在IGNITE_TCP_DISCOVERY_ADDRESSES环境变量或者同名的系统属性中进行指定,地址列表可以用逗号分隔,也可以包含可选的端口范围。
警告
TcpDiscoveryVmIpFinder默认用的是非共享模式,如果希望启动一个服务端节点,那么在该模式中的IP地址列表同时也要包含本地节点的一个IP地址。它允许节点不等待其它节点加入集群,而是成为第一个集群节点并正常运行。
下面的例子显示了如何通过Spring XML配置文件或者通过Java代码编程式地进行配置:
XML:
<bean class="org.apache.ignite.configuration.IgniteConfiguration">
  ...
  <property name="discoverySpi">
    <bean class="org.apache.ignite.spi.discovery.tcp.TcpDiscoverySpi">
      <property name="ipFinder">
        <bean class="org.apache.ignite.spi.discovery.tcp.ipfinder.vm.TcpDiscoveryVmIpFinder">
          <property name="addresses">
            <list>
              <!--
              Explicitly specifying address of a local node to let it start and
              operate normally even if there is no more nodes in the cluster.
              You can also optionally specify an individual port or port range.
              -->
              <value>1.2.3.4</value>

              <!--
              IP Address and optional port range of a remote node.
              You can also optionally specify an individual port.
              -->
              <value>1.2.3.5:47500..47509</value>
            </list>
          </property>
        </bean>
      </property>
    </bean>
  </property>
</bean>
Java:
TcpDiscoverySpi spi = new TcpDiscoverySpi();

TcpDiscoveryVmIpFinder ipFinder = new TcpDiscoveryVmIpFinder();

// Set initial IP addresses.
// Note that you can optionally specify a port or a port range.
ipFinder.setAddresses(Arrays.asList("1.2.3.4", "1.2.3.5:47500..47509"));

spi.setIpFinder(ipFinder);

IgniteConfiguration cfg = new IgniteConfiguration();

// Override default discovery SPI.
cfg.setDiscoverySpi(spi);

// Start Ignite node.
Ignition.start(cfg);
Shell:
# The configuration should use TcpDiscoveryVmIpFinder without addresses specified:

IGNITE_TCP_DISCOVERY_ADDRESSES=1.2.3.4,1.2.3.5:47500..47509 bin/ignite.sh -v config/default-config.xml
# 5.1.4.组播和静态IP探测器
可以同时使用基于组播和静态IP的发现,这种情况下,除了通过组播接受地址以外,如果有,TcpDiscoveryMulticastIpFinder也可以与预配置的静态IP地址列表一起工作,就像上面描述的基于静态IP的发现一样。
下面的例子显示了如何配置使用了静态IP地址的组播IP探测器。
XML:
<bean class="org.apache.ignite.configuration.IgniteConfiguration">
  ...
  <property name="discoverySpi">
    <bean class="org.apache.ignite.spi.discovery.tcp.TcpDiscoverySpi">
      <property name="ipFinder">
        <bean class="org.apache.ignite.spi.discovery.tcp.ipfinder.multicast.TcpDiscoveryMulticastIpFinder">
          <property name="multicastGroup" value="228.10.10.157"/>

          <!-- list of static IP addresses-->
          <property name="addresses">
            <list>
              <value>1.2.3.4</value>

              <!--
                  IP Address and optional port range.
                  You can also optionally specify an individual port.
              -->
              <value>1.2.3.5:47500..47509</value>
            </list>
          </property>
        </bean>
      </property>
    </bean>
  </property>
</bean>
Java:
TcpDiscoverySpi spi = new TcpDiscoverySpi();

TcpDiscoveryMulticastIpFinder ipFinder = new TcpDiscoveryMulticastIpFinder();

// Set Multicast group.
ipFinder.setMulticastGroup("228.10.10.157");

// Set initial IP addresses.
// Note that you can optionally specify a port or a port range.
ipFinder.setAddresses(Arrays.asList("1.2.3.4", "1.2.3.5:47500..47509"));

spi.setIpFinder(ipFinder);

IgniteConfiguration cfg = new IgniteConfiguration();

// Override default discovery SPI.
cfg.setDiscoverySpi(spi);

// Start Ignite node.
Ignition.start(cfg);
# 5.1.5.在同一个机器组中隔离Ignite集群
Ignite可以在同一组机器中启动两个隔离的集群,对于TcpDiscoverySpi和TcpCommunicationSpi,不同集群的节点使用不交叉的本地端口范围就可以了。
为了测试,假设需要在一台机器上启动两个互相隔离的集群,那么对于第一个集群的节点,需要使用如下的TcpDiscoverySpi和TcpCommunicationSpi配置:
XML:
<bean class="org.apache.ignite.configuration.IgniteConfiguration">
    ...
    <!--
    Explicitly configure TCP discovery SPI to provide list of
    initial nodes from the first cluster.
    -->
    <property name="discoverySpi">
        <bean class="org.apache.ignite.spi.discovery.tcp.TcpDiscoverySpi">
            <!-- Initial local port to listen to. -->
            <property name="localPort" value="48500"/>

            <!-- Changing local port range. This is an optional action. -->
            <property name="localPortRange" value="20"/>

            <!-- Setting up IP finder for this cluster -->
            <property name="ipFinder">
                <bean class="org.apache.ignite.spi.discovery.tcp.ipfinder.vm.TcpDiscoveryVmIpFinder">
                    <property name="addresses">
                        <list>
                            <!--
                            Addresses and port range of nodes from
                            the first cluster.
                            127.0.0.1 can be replaced with actual IP addresses
                            or host names. Port range is optional.
                            -->
                            <value>127.0.0.1:48500..48520</value>
                        </list>
                    </property>
                </bean>
            </property>
        </bean>
    </property>

    <!--
    Explicitly configure TCP communication SPI changing local
    port number for the nodes from the first cluster.
    -->
    <property name="communicationSpi">
        <bean class="org.apache.ignite.spi.communication.tcp.TcpCommunicationSpi">
            <property name="localPort" value="48100"/>
        </bean>
    </property>
</bean>
Java:
IgniteConfiguration cfg = new IgniteConfiguration();

// Explicitly configure TCP discovery SPI to provide list of initial nodes
// from the first cluster.
TcpDiscoverySpi discoverySpi = new TcpDiscoverySpi();

// Initial local port to listen to.
discoverySpi.setLocalPort(48500);

// Changing local port range. This is an optional action.
discoverySpi.setLocalPortRange(20);

TcpDiscoveryVmIpFinder ipFinder = new TcpDiscoveryVmIpFinder();

// Addresses and port range of the nodes from the first cluster.
// 127.0.0.1 can be replaced with actual IP addresses or host names.
// The port range is optional.
ipFinder.setAddresses(Arrays.asList("127.0.0.1:48500..48520"));

// Overriding IP finder.
discoverySpi.setIpFinder(ipFinder);

// Explicitly configure TCP communication SPI by changing local port number for
// the nodes from the first cluster.
TcpCommunicationSpi commSpi = new TcpCommunicationSpi();

commSpi.setLocalPort(48100);

// Overriding discovery SPI.
cfg.setDiscoverySpi(discoverySpi);

// Overriding communication SPI.
cfg.setCommunicationSpi(commSpi);

// Starting a node.
Ignition.start(cfg);
而对于第二个集群的节点,配置看起来是这样的:
XML:
<bean id="ignite.cfg" class="org.apache.ignite.configuration.IgniteConfiguration">
    <!--
    Explicitly configure TCP discovery SPI to provide list of initial
    nodes from the second cluster.
    -->
    <property name="discoverySpi">
        <bean class="org.apache.ignite.spi.discovery.tcp.TcpDiscoverySpi">
            <!-- Initial local port to listen to. -->
            <property name="localPort" value="49500"/>

            <!-- Changing local port range. This is an optional action. -->
            <property name="localPortRange" value="20"/>

            <!-- Setting up IP finder for this cluster -->
            <property name="ipFinder">
                <bean class="org.apache.ignite.spi.discovery.tcp.ipfinder.vm.TcpDiscoveryVmIpFinder">
                    <property name="addresses">
                        <list>
                            <!--
                            Addresses and port range of the nodes from the second                             cluster.
                            127.0.0.1 can be replaced with actual IP addresses or                             host names. Port range is optional.
                            -->
                            <value>127.0.0.1:49500..49520</value>
                        </list>
                    </property>
                </bean>
            </property>
        </bean>
    </property>

    <!--
    Explicitly configure TCP communication SPI changing local port number
    for the nodes from the second cluster.
    -->
    <property name="communicationSpi">
        <bean class="org.apache.ignite.spi.communication.tcp.TcpCommunicationSpi">
            <property name="localPort" value="49100"/>
        </bean>
    </property>
</bean>
Java:
IgniteConfiguration cfg = new IgniteConfiguration();

// Explicitly configure TCP discovery SPI to provide list of initial nodes
// from the second cluster.
TcpDiscoverySpi discoverySpi = new TcpDiscoverySpi();

// Initial local port to listen to.
discoverySpi.setLocalPort(49500);

// Changing local port range. This is an optional action.
discoverySpi.setLocalPortRange(20);

TcpDiscoveryVmIpFinder ipFinder=new TcpDiscoveryVmIpFinder();

// Addresses and port range of the nodes from the second cluster.
// 127.0.0.1 can be replaced with actual IP addresses or host names.
// The port range is optional.
ipFinder.setAddresses(Arrays.asList("127.0.0.1:49500..49520"));

// Overriding IP finder.
discoverySpi.setIpFinder(ipFinder);

// Explicitly configure TCP communication SPI by changing local port number for
// the nodes from the second cluster.
TcpCommunicationSpi commSpi = new TcpCommunicationSpi();

commSpi.setLocalPort(49100);

// Overriding discovery SPI.
cfg.setDiscoverySpi(discoverySpi);

// Overriding communication SPI.
cfg.setCommunicationSpi(commSpi);

// Starting a node.
Ignition.start(cfg);
从配置中可以看到,它们的差别是很小的 - 只是SPI的端口号和IP探测器不同。
注意
如果希望不同集群的节点之间可以互相探测到,可以使用组播协议然后将TcpDiscoveryVmIpFinder替换为TcpDiscoveryMulticastIpFinder并且在上面的每个配置中设置唯一的TcpDiscoveryMulticastIpFinder.multicastGroups。
Ignite持久化的文件位置
如果隔离的集群使用了Ignite持久化,那么在文件系统中每个集群会将持久化文件保存在不同的路径中。通过DataStorageConfiguration中的setStoragePath(...)、setWalPath(...)、setWalArchivePath(...)方法可以针对每个单独的集群进行修改。
# 5.1.6.JDBC探测器
可以用数据库作为通用共享存储来保存初始的IP地址,通过这个探测器这些节点会在启动时将IP地址写入数据库,这是通过TcpDiscoveryJdbcIpFinder实现的。
XML:
<bean class="org.apache.ignite.configuration.IgniteConfiguration">
  ...
  <property name="discoverySpi">
    <bean class="org.apache.ignite.spi.discovery.tcp.TcpDiscoverySpi">
      <property name="ipFinder">
        <bean class="org.apache.ignite.spi.discovery.tcp.ipfinder.jdbc.TcpDiscoveryJdbcIpFinder">
          <property name="dataSource" ref="ds"/>
        </bean>
      </property>
    </bean>
  </property>
</bean>

<!-- Configured data source instance. -->
<bean id="ds" class="some.Datasource">
  ...
</bean>
Java:
TcpDiscoverySpi spi = new TcpDiscoverySpi();

// Configure your DataSource.
DataSource someDs = MySampleDataSource(...);

TcpDiscoveryJdbcIpFinder ipFinder = new TcpDiscoveryJdbcIpFinder();

ipFinder.setDataSource(someDs);

spi.setIpFinder(ipFinder);

IgniteConfiguration cfg = new IgniteConfiguration();

// Override default discovery SPI.
cfg.setDiscoverySpi(spi);

// Start Ignite node.
Ignition.start(cfg);
# 5.1.7.基于共享文件系统探测器
一个共享文件系统可以用于节点IP地址的存储,节点会在启动时将它们的IP地址写入文件系统,这样的行为是由TcpDiscoverySharedFsIpFinder支持的。
XML:
<bean class="org.apache.ignite.configuration.IgniteConfiguration">
  ...
  <property name="discoverySpi">
    <bean class="org.apache.ignite.spi.discovery.tcp.TcpDiscoverySpi">
      <property name="ipFinder">
        <bean class="org.apache.ignite.spi.discovery.tcp.ipfinder.sharedfs.TcpDiscoverySharedFsIpFinder">
          <property name="path" value="/var/ignite/addresses"/>
        </bean>
      </property>
    </bean>
  </property>
</bean>
Java:
// Configuring discovery SPI.
TcpDiscoverySpi spi = new TcpDiscoverySpi();

// Configuring IP finder.
TcpDiscoverySharedFsIpFinder ipFinder = new TcpDiscoverySharedFsIpFinder();

ipFinder.setPath("/var/ignite/addresses");

spi.setIpFinder(ipFinder);

IgniteConfiguration cfg = new IgniteConfiguration();

// Override default discovery SPI.
cfg.setDiscoverySpi(spi);

// Start Ignite node.
Ignition.start(cfg);
# 5.1.8.基于ZooKeeper的发现
如果使用ZooKeeper 来整合分布式环境,也可以利用它进行Ignite节点的发现,这是通过TcpDiscoveryZooKeeperIpFinder实现的(注意需要启用ignite-zookeeper模块)。
XML:
<bean class="org.apache.ignite.configuration.IgniteConfiguration">
    ...
    <property name="discoverySpi">
        <bean class="org.apache.ignite.spi.discovery.tcp.TcpDiscoverySpi">
            <property name="ipFinder">
                <bean class="org.apache.ignite.spi.discovery.tcp.ipfinder.zk.TcpDiscoveryZooKeeperIpFinder">
                    <property name="zkConnectionString" value="127.0.0.1:2181"/>
                </bean>
            </property>
        </bean>
    </property>
</bean>
Java:
TcpDiscoverySpi spi = new TcpDiscoverySpi();

TcpDiscoveryZooKeeperIpFinder ipFinder = new TcpDiscoveryZooKeeperIpFinder();

// Specify ZooKeeper connection string.
ipFinder.setZkConnectionString("127.0.0.1:2181");

spi.setIpFinder(ipFinder);

IgniteConfiguration cfg = new IgniteConfiguration();

// Override default discovery SPI.
cfg.setDiscoverySpi(spi);

// Start Ignite node.
Ignition.start(cfg);
# 5.1.9.故障检测超时
故障检测超时用于确定一个集群节点在与远程节点连接失败时可以等待多长时间。
集群中的每个节点都是与其它节点连接在一起的,在发现SPI这个层级,NodeA会向NodeB发送心跳消息(还有其它在集群内传输的系统消息),如果后者在failureDetectionTimeout指定的时间范围内没有反馈,那么NodeB会被从集群中踢出。
根据集群的硬件和网络条件,这个超时时间是调整发现SPI的故障检测功能的最简单的方式。
注意
这些TcpDiscoverySpi的超时配置参数是自动控制的,比如套接字超时,消息确认超时以及其它的,如果显式地设置了这些参数中的任意一个,故障超时设置都会被忽略掉。
关于故障检测超时的配置,对于服务端节点是通过IgniteConfiguration.setFailureDetectionTimeout(long)方法配置的,对于客户端节点是通过IgniteConfiguration.setClientFailureDetectionTimeout(long)方法配置的。关于默认值,服务端节点为10秒,客户端节点为30秒,这个时间可以使发现SPI在大多数的私有和虚拟化环境下可靠地工作,但是对于一个稳定的低延迟网络来说,这个参数设置成大约200毫秒会更有助于快速地进行故障的检测和响应。
# 5.1.10.配置
下面的配置参数可以对TcpDiscoverySpi进行可选的配置,在TcpDiscoverySpi的javadoc中还可以看到完整的配置参数列表:
| setter方法 | 描述 | 默认值 |
|---|---|---|
setIpFinder(TcpDiscoveryIpFinder) | 用于节点IP地址信息共享的IP探测器 | TcpDiscoveryMulticastIpFinder,部分实现如下:TcpDiscoverySharedFsIpFinder,TcpDiscoveryS3IpFinder,TcpDiscoveryJdbcIpFinder,TcpDiscoveryVmIpFinder |
setLocalAddress(String) | 设置发现SPI使用的本地主机IP地址 | 如果未提供,默认会使用发现的第一个非loopback地址,如果没有可用的非loopback地址,那么会使用java.net.InetAddress.getLocalHost() |
setLocalPort(int) | SPI监听端口 | 47500 |
setLocalPortRange(int) | 本地端口范围,本地节点会试图绑定从localPort开始的第一个可用的端口,直到localPort+localPortRange | 100 |
setReconnectCount(int) | 节点与其它节点试图(重新)建立连接的次数 | 2 |
setNetworkTimeout(long) | 用于拓扑操作的最大超时时间 | 5000 |
setSocketTimeout(long) | 设置Socket操作超时时间,这个超时时间用于限制连接时间以及写Socket时间 | 2000 |
setAckTimeout(long) | 设置收到发送消息的确认的超时时间,如果在这个时间段内未收到确认,发送会被认为失败然后SPI会试图重新发送消息 | 2000 |
setJoinTimeout(long) | 设置加入超时时间,如果使用了非共享的IP探测器然后节点通过IP探测器无法与任何地址建立连接,节点会在这个时间段内仍然试图加入集群。如果所有地址仍然无响应,会抛出异常然后节点启动失败,0意味着一直等待 | 0 |
setThreadPriority(int) | SPI启动的线程的线程优先级 | 0 |
setStatisticsPrintFrequency(int) | 统计输出的频率(毫秒),0意味着不需要输出。如果值大于0那么日志就会激活,然后每隔一段时间就会以INFO级别输出一个状态,这对于跟踪拓扑的问题非常有用。 | 0 |
# 5.2.ZooKeeper发现
# 5.2.1.概述
Ignite使用TCP/IP发现机制,将集群节点组织成环状拓扑结构有其优点,也有缺点。比如在一个有上百个节点的拓扑中,系统消息遍历所有的节点需要花很多秒,就结果来说,基本的事件处理,比如新节点加入或者故障节点检测,就会影响整个集群的响应能力和性能。
ZooKeeper发现机制是为需要保证伸缩性和线性扩展的大规模Ignite集群而设计的。但是同时使用Ignite和ZooKeeper需要配置和管理两个分布式系统,这很有挑战性。因此,建议仅在打算扩展到成百或者上千个节点时才使用该发现机制。否则,最好使用TCP/IP发现。
ZooKeeper发现使用ZooKeeper作为同步的单点,然后将Ignite集群组织成一个星型拓扑,这时ZooKeeper集群位于中心,然后Ignite节点通过它进行发现事件的交换。
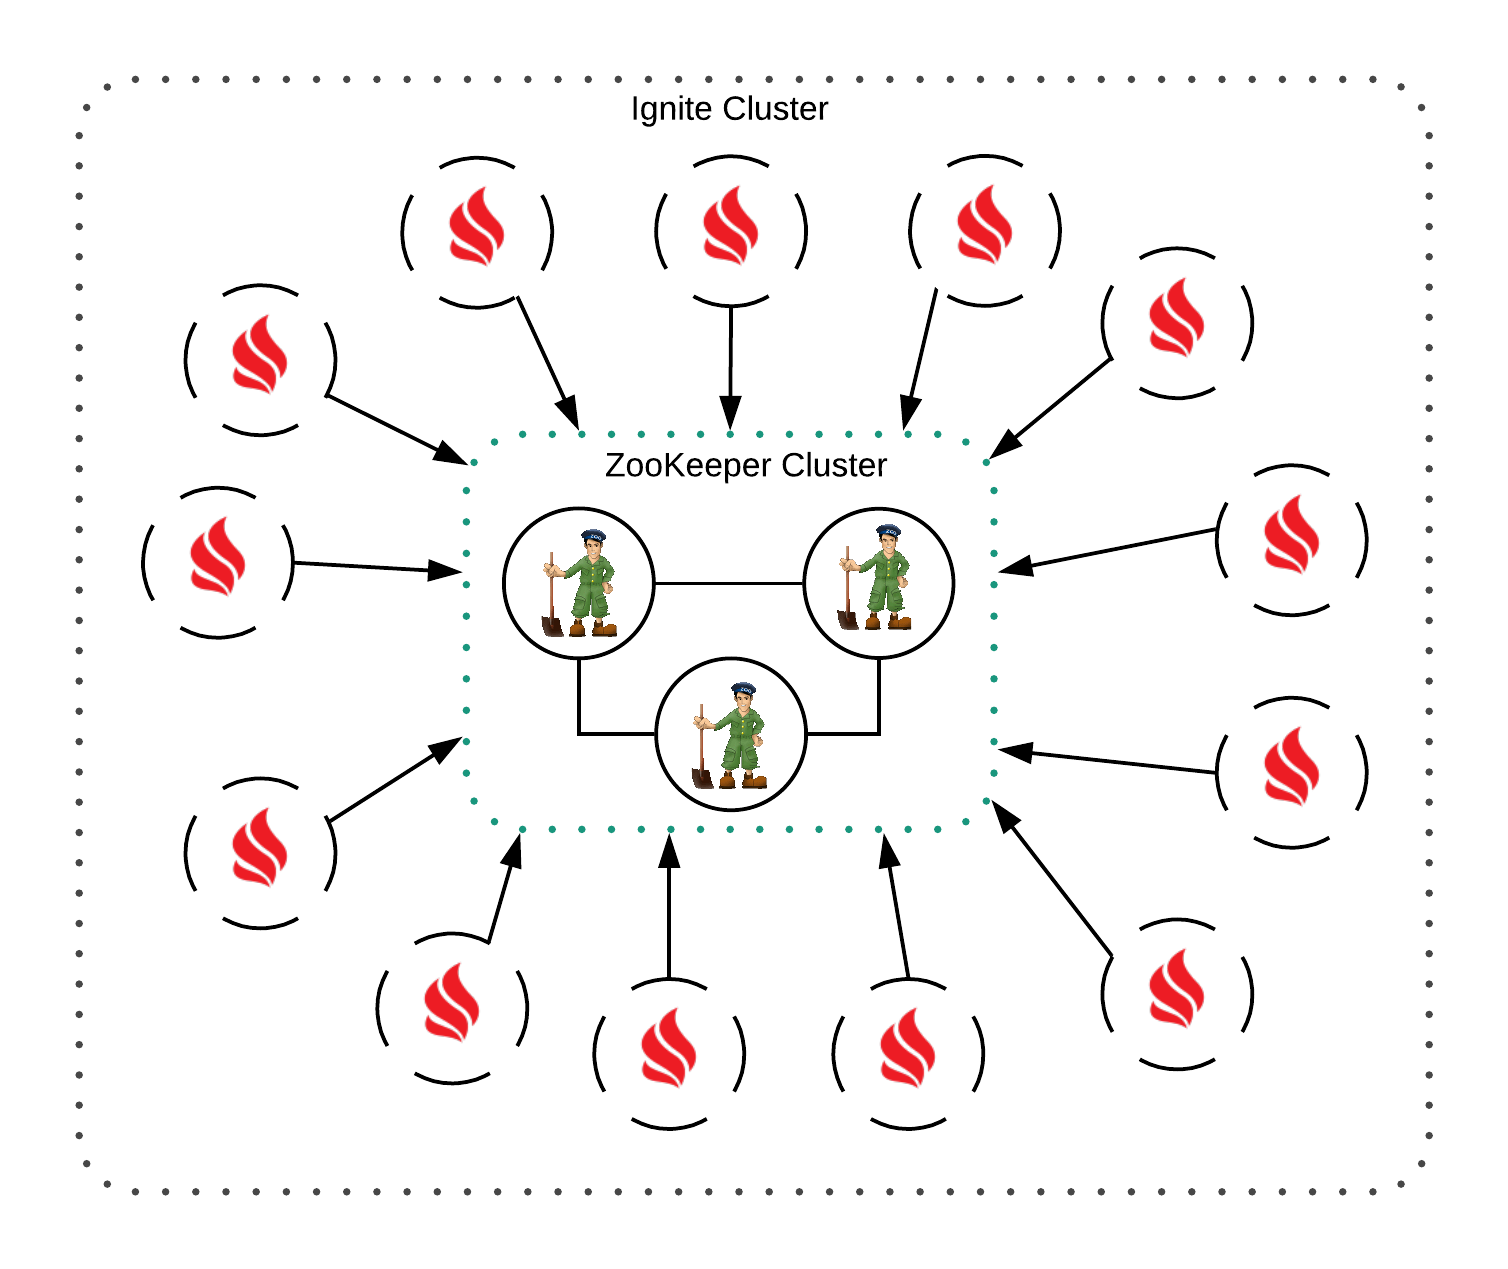
值得一提的是,ZooKeeper发现仅仅是发现机制的一个实现,不会影响Ignite节点间的通信(可以看网络配置章节)。节点之间一旦通过ZooKeeper发现机制彼此探测到,它们就会使用Communication SPI进行点对点的通信。
# 5.2.2.配置
要启用ZooKeeper发现,需要配置ZooKeeperDiscoverySpi:
XML:
<bean class="org.apache.ignite.configuration.IgniteConfiguration">
  ...
  <property name="discoverySpi">
    <bean class="org.apache.ignite.spi.discovery.zk.ZookeeperDiscoverySpi">
      <property name="zkConnectionString" value="127.0.0.1:34076,127.0.0.1:43310,127.0.0.1:36745"/>
      <property name="sessionTimeout" value="30000"/>
      <property name="zkRootPath" value="/apacheIgnite"/>
      <property name="joinTimeout" value="10000"/>
    </bean>
  </property>
</bean>
Java:
ZookeeperDiscoverySpi zkDiscoSpi = new ZookeeperDiscoverySpi();

zkDiscoSpi.setZkConnectionString(
  "127.0.0.1:34076,127.0.0.1:43310,127.0.0.1:36745");
zkDiscoSpi.setSessionTimeout(30_000);

zkDiscoSpi.setZkRootPath("");
zkDiscoSpi.setJoinTimeout(10_000);

IgniteConfiguration cfg = new IgniteConfiguration();

//Override default discovery SPI.
cfg.setDiscoverySpi(zkDiscoSpi);

// Start Ignite node.
Ignition.start(cfg);
下面两个参数是必须的(其它的是可选的):
zkConnectionString:ZooKeeper服务器地址列表;sessionTimeout:如果无法通过发现SPI进行事件消息的交换,多久之后节点会被视为断开连接。
# 5.2.3.故障和脑裂处理
在拓扑分区的情况下,一些节点由于位于分离的网络段而不能相互通信,这可能导致处理用户请求失败或不一致的数据修改。
ZooKeeper发现机制通过如下的方式来处理拓扑分区(脑裂)以及单个节点之间的通信故障:
注意
假定集群中的所有节点都可以访问ZooKeeper集群。事实上,如果一个节点与ZooKeeper断开,那么它就会停止,然后其它节点就会将其视为故障或者失联。
当节点发现它不能连接到集群中的其它节点时,它就通过向ZooKeeper集群发布特殊请求来启动一个通信故障解决进程。该进程启动后,所有节点尝试彼此连接,并将连接尝试的结果发送到协调进程的节点(协调器节点)。基于此信息,协调器节点创建表示集群中的网络状况的连接图,而进一步的动作取决于网络分区的类型。
集群被分为若干个不相交的部分
如果集群被分成几个独立的部分,每个部分(作为一个集群)可能认为自己是一个主集群并继续处理用户请求,从而导致数据不一致。为了避免这种情况,只有节点数量最多的部分保持活动,而其它部分的节点会被关闭。
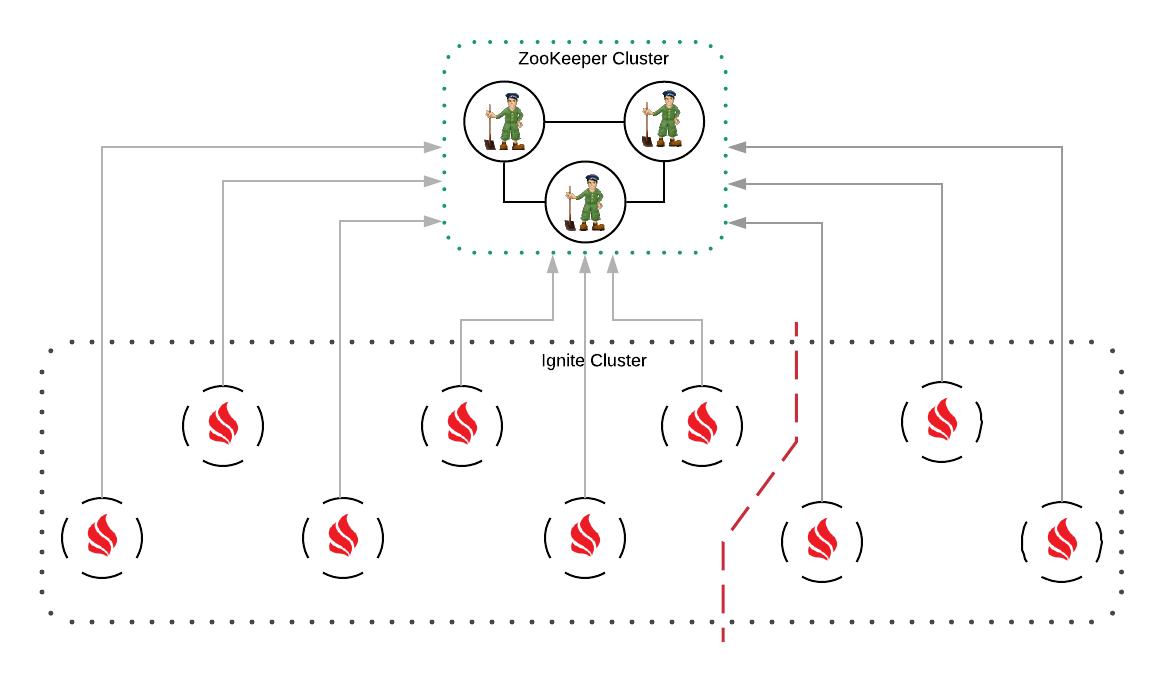
上图显示集群被分为了两个部分,小集群中的节点(右侧的部分)会被终止。
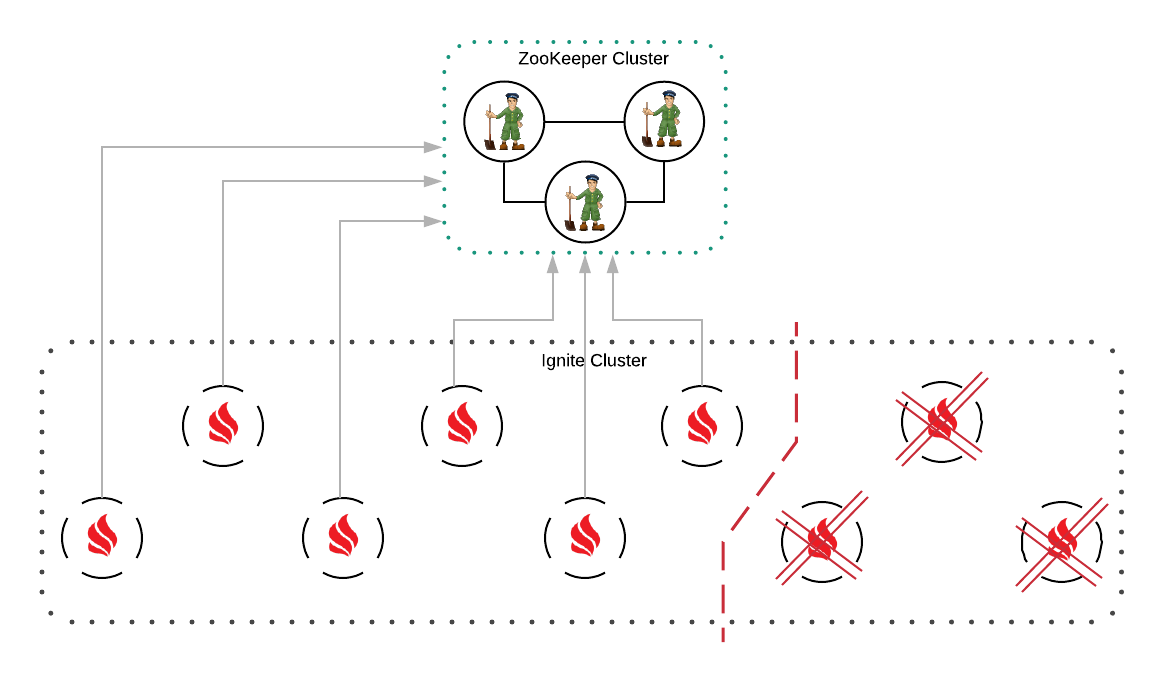
当有多个最大的部分时,具有最大数量的客户端的部分保持活动,而其它部分则关闭。
节点间部分连接丢失
一些节点无法连接到其它一些节点,这意味着虽然这些节点没有完全与集群断开连接,但是无法与一些节点交换数据,因此不能成为集群的一部分。在下图中,一个节点不能连接到其它两个节点:
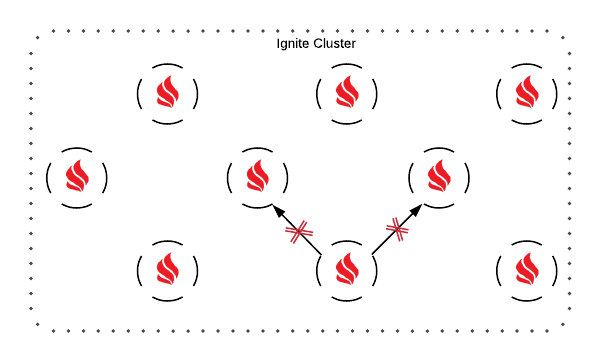
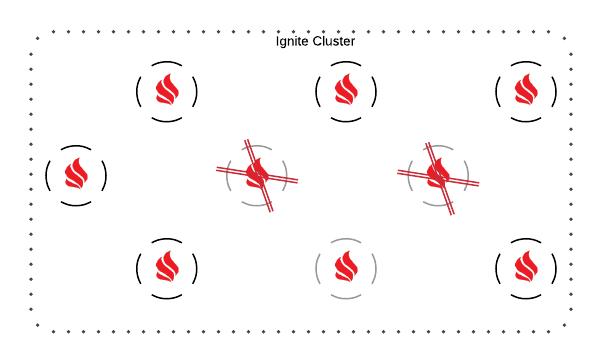
这时,任务就是找到每个节点可以连接到每个其它节点的最大部分,这通常是一个难题,在可接受的时间内无法解决。协调器节点会使用启发式算法来寻找最佳近似解,解中忽略的节点将被关闭。
ZooKeeper集群分区
在大规模集群中,ZooKeeper集群可以跨越多个数据中心和地理上不同的位置,由于拓扑分割,它可以分成多个段。如果出现这种情况,ZooKeeper将检查是否存在一个包含所有ZooKeeper节点的一半以上的段(对于ZooKeeper继续其操作来说,需要这么多节点),如果找到,这个段将接管Ignite集群的管理,而其它段将被关闭。如果没有这样的段,ZooKeeper将关闭它的所有节点。
在ZooKeeper集群分区的情况下,Ignite集群可以分割也可以不分割。在任何情况下,当关闭ZooKeeper节点时,相应的Ignite节点将尝试连接到可用ZooKeeper节点,如果不能这样做,则将关闭。
下图是将Ignite集群和ZooKeeper集群分割成两个部分的拓扑分区示例。如果集群部署在两个数据中心,则可能出现这种情况。这时,位于数据中心B的ZooKeeper节点将自动关闭,而位于数据中心B的Ignite节点因为无法连接到其余ZooKeeper节点,因此也将关闭自己。

# 5.2.4.自定义发现事件
将环形拓扑变更为星型拓扑,影响了发现SPI处理自定义发现事件的方式。因为环形拓扑是线性的,这意味着每个发现消息是被节点顺序处理的,因此在某个特定时间,只会有一个节点在处理消息。
而在ZooKeeper发现机制中,协调器会同时将发现消息发送给所有节点,结果就是消息的并行处理。
这种并行处理的结果就是,ZooKeeper发现机制不允许对自定义发现事件的修改,比如,节点不允许为发现消息添加任何负载。
# 5.2.5.Ignite和ZooKeeper的配置一致性
使用ZooKeeper发现机制,需要确保两个系统的配置参数相互匹配不矛盾。
比如下面的ZooKeeper简单配置:
# The number of milliseconds of each tick
tickTime=2000

# The number of ticks that can pass between
# sending a request and getting an acknowledgement
syncLimit=5
如果这样配置,只有过了tickTime * syncLimit时限,ZooKeeper服务器才会发觉它是否与剩余的ZooKeeper集群分区,在ZooKeeper的这段时间之内,所有的Ignite节点都会接入该已分割的ZooKeeper服务器,而不会与其它的ZooKeeper服务器进行连接。
另一方面,在Ignite端有一个sessionTimeout参数,它定义了如果节点与ZooKeeper集群断开,多长时间ZooKeeper会关闭Ignite节点的会话,如果sessionTimeout比tickTime * syncLimit小,那么Ignite节点就会被分割的ZooKeeper服务器过早地通知,即会话会在其试图连接其它的ZooKeeper服务器之前过期。
要避免这种情况发生,sessionTimeout要比tickTime * syncLimit大。
# 6.零部署
# 6.1.概述
计算所需的闭包和任务可能是任意自定义的类,也包括匿名类。Ignite中,远程节点会自动感知这些类,不需要显式地将任何jar文件部署或者移动到任何远程节点上。
# 6.2.对等类加载
这个行为是通过对等类加载(P2P类加载)实现的,它是Ignite中的一个特别的分布式类加载器,实现了节点间的字节码交换。当对等类加载启用时,不需要在网格内的每个节点上手工地部署Java或者Scala代码,也不需要每次在发生变化时重新部署。
下面的代码由于对等类加载会在所有的远程节点上运行,不需要任何的显式部署步骤:
IgniteCluster cluster = ignite.cluster();

// Compute instance over remote nodes.
IgniteCompute compute = ignite.compute(cluster.forRemotes());

// Print hello message on all remote nodes.
compute.broadcast(() -> System.out.println("Hello node: " + cluster.localNode().id()));
下面是对等类加载如何配置:
XML:
<bean class="org.apache.ignite.configuration.IgniteConfiguration">
    ...
    <!-- Explicitly enable peer class loading. -->
    <property name="peerClassLoadingEnabled" value="true"/>
    ...
</bean>
Java:
IgniteConfiguration cfg = new IgniteConfiguration();

cfg.setPeerClassLoadingEnabled(true);

// Start Ignite node.
Ignite ignite = Ignition.start(cfg);
对等类加载的工作步骤如下:
- Ignite会检查类是否在本地CLASSPATH中有效(是否在系统启动时加载),如果有效,就会被返回。这时不会发生从对等节点加载类的行为。
- 如果类本地不可用,会向发起节点发送一个提供类定义的请求,发起节点会发送类字节码定义然后类会在工作节点上加载。这个每个类只会发生一次,即一旦一个节点上一个类定义被加载了,它就不会再次加载了。
第三方库
当使用对等类加载时,会发现可能从对等节点加载库,还可能本地类路径就已经存在库。建议在每个节点的类路径里包含所有的第三方库,这可以通过将jar文件复制到Ignite的libs文件夹实现,这样就可以避免每次只改变了一行代码然后还需要向远程节点上传输若干M的第三方库文件。
# 6.3.显式部署
要在Ignite中显式地部署jar文件,可以将它们拷贝进每个集群节点的libs文件夹,Ignite会在启动时自动加载所有的libs文件夹中的jar文件。
# 7.部署模式
# 7.1.概述
对等类加载行为的特性是由不同的部署模式控制的。特别地,当发起节点或者主节点离开网格时的卸载行为也会依赖于部署模式。另一方面,部署模式控制的,还有用户资源管理和类版本管理。在下面的章节中会更详细地描述每个部署模式。
PRIVATE和ISOLATED
在主节点,同一个类加载器部署的类,还会在工作节点远程共享同一个类加载器。不过从不同主节点部署的任务不会在工作节点共享同一个类加载器,这对于开发很有用,这时不同的开发者可以工作于同一个类的不同版本上。
自从@UserResource注解删除后,PRIVATE和ISOLATED部署模式就没有不同了。这两个常量都因为后向兼容的原因保留了,并且这两个之一可能在未来的大版本中被删除。
这个模式中,当主节点离开集群时,类会卸载。
SHARED
这是默认的部署模式。这个模式中,来自不同主节点的、用户版本相同的类会在工作节点上共享同一个类加载器。当所有主节点离开网格或者用户版本发生变化时,类会卸载。这个模式可以使来自不同主节点的类在远程节点上共享用户资源的同一个实例(见下面)。这个模式对于生产环境特别有用,与ISOLATED模式相比,它在单一主节点上有一个单一类加载器的作用域,SHARED模式会向所有主节点扩展部署作用域。
这个模式中,当所有的主节点离开集群时,类会卸载。
CONTINUOUS
在CONTINUOUS模式中,当主节点离开网格时类不会卸载。卸载只会发生于类的用户版本发生变化时。这个方式的优势是可以使来自不同主节点的任务在工作节点共享同一个用户资源的实例(参见资源注入),这使得在工作节点上执行的所有任务可以复用,比如,连接池或者缓存的同一个实例。当用这个模式时,可以启动多个独立的工作节点,在主节点定义用户资源并且在工作节点上初始化一次,不管它们来自那个主节点。与ISOLATED部署模式相比,它在单一主节点上有一个单一类加载器的作用域,CONTINUOUS模式会向所有主节点扩展部署作用域,这对于生产环境非常有用。
这个模式中,即使所有的主节点离开集群,类都不会卸载。
# 7.2.卸载和用户版本
通过对等类加载获得的类定义,有它们自己的生命周期。在特定的事件中(当主节点离开或者用户版本变化,依赖于部署模式),类信息会从集群中卸载,类定义会从网格中的所有节点和用户资源抹掉,与该类链接的,也会有选择地抹掉(还是依赖于部署模式)。对于内存数据网格,还意味着一个卸载的类的所有缓存条目都会从缓存删除。不过如果使用了二进制编组器,后者并不适用,它允许以二进制的形式存储缓存数据来避免从一个主节点加载条目的必要性。
当部署于SHARED和CONTINUOUS模式时,如果想重新部署类,用户版本来了。Ignite默认会自动检测类加载器是否改变或者一个节点是否重新启动。不过如果希望在节点的一个子集上改变或者重新部署代码,或者在CONTINUOUS模式中,杀掉所有的现存部署,那么需要修改用户版本。
用户版本是在类路径的META-INF/ignite.xml中指定的,像下面这样:
<!-- User version. -->
<bean id="userVersion" class="java.lang.String">
    <constructor-arg value="0"/>
</bean>
所有的Ignite启动脚本(ignite.sh或者ignite.bat)默认都会从IGNITE_HOME/config/userversion文件夹获取用户版本。通常,在这个文件夹中更新用户版本就够了,不过当使用GAR或者JAR部署时,需要记得提供一个META-INF/ignite.xml文件,里面有期望的用户版本。
# 7.3.配置
下面的对于对等类加载的配置参数可以在IgniteConfiguration中进行可选的配置:
| setter方法 | 描述 | 默认值 |
|---|---|---|
setPeerClassLoadingEnabled() | 启用/禁用对等类加载 | false |
setPeerClassLoadingExecutorService() | 配置对等类加载使用的线程池,如果未配置,会使用一个默认的。 | null |
setPeerClassLoadingExecutorServiceShutdown() | 对等类加载ExecutorService关闭标志,如果该标志设置为true,对等类加载线程池当节点停止时会强制关闭。 | true |
setPeerClassLoadingLocalClassPathExclude() | 系统类路径的包列表,即使它们在本地存在,P2P也不会加载。 | null |
setPeerClassLoadingMissedResourcesCacheSize() | 错过的资源缓存的大小,设为0会避免错过的资源缓存。 | 100 |
setDeploymentMode() | 为部署的类和任务设置部署模式。 | SHARED |
XML:
<bean class="org.apache.ignite.configuration.IgniteConfiguration">
    <!--
        Explicitly enable peer class loading. Set to false
        to disable the feature.
    -->
    <property name="peerClassLoadingEnabled" value="true"/>

    <!-- Set deployment mode. -->
    <property name="deploymentMode" value="CONTINUOUS"/>

    <!-- Disable missed resources caching. -->
    <property name="peerClassLoadingMissedResourcesCacheSize" value="0"/>

    <!--
        Exclude force peer class loading of a class,
        even if exists locally.
    -->
    <property name="peerClassLoadingLocalClassPathExclude">
        <list>
            <value>com.mycompany.MyChangingClass</value>
        </list>
    </property>
</bean>
Java:
IgniteConfiguration cfg=new IgniteConfiguration();

// Explicitly enable peer class loading.
cfg.setPeerClassLoadingEnabled(true);

// Set deployment mode.
cfg.setDeploymentMode(DeploymentMode.CONTINUOUS);

// Disable missed resource caching.
cfg.setPeerClassLoadingMissedResourcesCacheSize(0);

// Exclude force peer class loading of a class,
// even if it exists locally.
cfg.setPeerClassLoadingLocalClassPathExclude("com.mcompany.MyChangingClass");

// Start a node.
Ignition.start(cfg);
# 8.网络配置
# 8.1.TcpCommunicationSpi
CommunicationSpi为发送和接收网格消息提供了基本的管道,它也被用于所有的分布式网格操作,比如执行任务,监控数据交换,分布式事件查询以及其它的。Ignite提供了TcpCommunicationSpi作为CommunicationSpi的默认实现,它使用TCP/IP协议来进行节点间的通信。
要启用节点间的通信,TcpCommunicationSpi增加了TcpCommuncationSpi.ATTR_ADDRS和TcpCommuncationSpi.ATTR_PORT本地节点属性。启动时,这个SPI会监听由TcpCommuncationSpi.setLocalPort(int)方法设置的本地端口。如果端口被占用,SPI会自动增加端口号直到成功绑定监听。
TcpCommuncationSpi.setLocalPortRange(int)配置参数控制了SPI可以尝试的最大端口数量。
本地端口范围
当在一台机器上甚至是在同一个JVM上启动多个网格节点时,端口范围会非常方便,这样所有的节点都会启动而不用一个个地进行单独的配置。
# 8.2.配置
下面TcpCommunicationSpi中的配置参数都是可选的:
| 方法 | 描述 | 默认值 |
|---|---|---|
setLocalAddress() | 设置套接字绑定的本地主机地址 | 任意有效的本地主机地址 |
setLocalPort() | 设置套接字绑定的本地主机端口 | 47100 |
setLocalPortRange() | 当之前尝试的所有端口都被占用时,控制尝试的本地端口的最大数量。 | 100 |
setTcpNoDelay() | 设置套接字选项TCP_NODELAY的值,每个创建或者接收的套接字都会使用这个值,它应该设置为true(默认),以减少通过TCP协议进行通讯期间请求/响应的时间。大多数情况下不建议改变这个选项 | true |
setConnectTimeout() | 设置当与远程节点建立连接时使用的连接超时时间。 | 1000 |
setIdleConnectionTimeout() | 设置当与客户端的连接将要关闭时,最大空闲连接超时时间。 | 30000 |
setBufferSizeRatio() | 设置这个SPI的缓冲区大小比率,当发送消息时,缓冲区大小会使用这个比率进行调整。 | 0.8,或者设置了IGNITE_COMMUNICATION_BUF_RESIZE_RATIO系统属性值 |
setMinimumBufferedMessageCount() | 设置这个SPI的最小消息数量,它们在发送之前被缓冲。 | 512,或者设置了IGNITE_MIN_BUFFERED_COMMUNICATION_MSG_CNT系统属性 |
setUsePairedConnections() | 设置节点间是否要强制双向套接字连接的标志,如果设置为true,通信的节点间会建立两个独立的连接,一个用于输出消息,一个用于输入,如果设置为false,只会建立一个TCP连接用于双向通信,当消息的传递花费太长时间时,这个标志对于某些操作系统非常有用。 | false |
setConnectionBufferSize() | 只有当setAsyncSend(boolean)设置为false时,这个参数才有用。设置同步连接时的缓冲区大小,当同步地发送和接收大量的小消息时,可以增加缓冲区大小。不过大多数情况下这个值应该设置为0(默认)。 | 0 |
setSelectorsCount() | 设置TCP服务器使用的选择器数量。 | 默认的选择器数量等于Math.min(4, Runtime.getRuntime() .availableProcessors())这个表达式的结果 |
setConnectionBufferFlushFrequency() | 只有当setAsyncSend(boolean)设置为false时,这个参数才有用。设置连接缓冲区刷新频率(毫秒),这个参数只有当同步发送并且连接缓冲区大小非0时才有意义。一旦在指定的时间段内如果没有足够的消息让其自动刷新时,缓冲区会被刷新。 | 100 |
setDirectBuffer() | 在使用NIO Direct以及NIO Heap分配缓冲区之间进行切换。虽然Direct Buffer执行的更好,但有时(尤其在Windows)可能会造成JVM崩溃,如果在自己的环境中发生了,需要将这个属性设置为false。 | true |
setDirectSendBuffer() | 当使用异步模式进行消息发送时,在使用NIO Direct以及NIO Heap分配缓冲区之间进行切换。 | false |
setAsyncSend() | 在同步或者异步消息发送之间进行切换。当节点间通过网络以多线程的方式发送大量的数据时,这个值应该设为true(默认),但是这个依赖于环境以及应用,因此建议对应用针对这两种模式进行基准测试。 | true |
setSharedMemoryPort() | 当在同一台主机上启动了IpcSharedMemoryServerEndpoint节点时,通过IPC共享内存进行通信的端口(只针对Linux和MacOS主机),设置为-1可以禁用IPC共享内存通信。 | 48100 |
setSocketReceiveBuffer() | 设置这个SPI创建或者接收的套接字的接收缓冲区大小,如果未指定,默认值为0,它会导致套接字创建之后缓冲区无法交换(即使用操作系统默认值)。 | 0 |
setSocketSendBuffer() | 设置这个SPI创建或者接收的套接字的发送缓冲区大小,如果未指定,默认值为0,它会导致套接字创建之后缓冲区无法交换(即使用操作系统默认值)。 | 0 |
示例
下面的示例显示了如何调整TcpCommunicationSpi的参数:
XML:
<bean class="org.apache.ignite.configuration.IgniteConfiguration">
  ...
  <property name="communicationSpi">
    <bean class="org.apache.ignite.spi.communication.tcp.TcpCommunicationSpi">
      <!-- Override local port. -->
      <property name="localPort" value="4321"/>
    </bean>
  </property>
  ...
</bean>
Java:
TcpCommunicationSpi commSpi = new TcpCommunicationSpi();
// Override local port.
commSpi.setLocalPort(4321);
IgniteConfiguration cfg = new IgniteConfiguration();
// Override default communication SPI.
cfg.setCommunicationSpi(commSpi);
// Start grid.
Ignition.start(cfg);